 In the past, as soon as Windows was installed, we had to immediately choose a good antivirus before being able to surf the Internet, so as to minimize the risk of infections. This need is no longer urgent, given that Windows 10 has a good antivirus inside, more than enough to protect your computer against viruses and malware: Microsoft Defender, also known by the old name Windows Defender.
Windows Defender is a complete antivirus solution, with real-time protection features, that updates regularly, can protect against advanced infections, and is so well integrated into the operating system that it has very little impact on performance. This is why we decided to make one guide to Microsoft Defender (or Windows Defender), the Windows 10 antivirus, so you can learn how to use it and drastically reduce the risk of infections.
ALSO READ: How to start scans and manage Microsoft Defender options from the Powershell command line
Articolo Index
- How to activate Microsoft Defender
- How to check for updates
- How to scan your computer
- How to schedule automatic scanning
- How to activate advanced protection (anti-ransomware, sandbox etc.)
- How to exclude files from scanning
- How to disable Microsoft Defender
- Conclusions
How to activate Microsoft Defender
The real-time scanning module of Windows Defender is active by default on every Windows 10 installation, we will not have to activate any voice to get its protection.Do we want to check if all protection modules are active? All we have to do is open the Start menu at the bottom left, open the app Settings and take us on the path Update & Security -> Windows Security -> Virus & Threat Protection and click Manage settings, under the section Virus and threat protection settings.
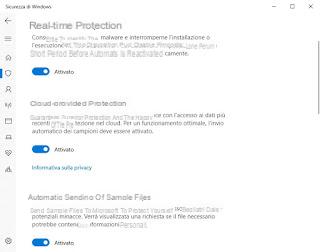
To get the maximum protection from the antivirus, make sure that the buttons under the sections are active Real-time protection, Cloud-Provided Protection e Automatic submission of sample files.
In any case, the antivirus will show notifications in case of problems, virus detections or deactivated modules are revealed, in addition it will change the icon Windows security bottom right (the white shield will show a red X instead of the classic green check).
How to check for updates
For updates, Microsoft Defender downloads new virus definitions and scan module updates along with system updates, then tramite the Windows Update service, which we remember works completely automatically on Windows 10.
If we notice that the antivirus does not update automatically, we can check if the automatic Windows update has been disabled (by mistake or by choice), taking us to Settings -> Update and Security -> Windows Update, by clicking Advanced options and checking that the button under the item is not active Pause updates.
If we want to proceed with a manual update, let's take the path again Settings -> Update and Security -> Windows Update and click Check for updates.
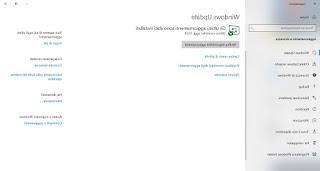
Alternatively we can also right-click on the Windows Security icon at the bottom right and select the item Check for security updates to be able to update our Defender immediately.
To restore automatic updates on each version of Windows, please read our guide on how fix update problems and errors in Windows Update.
How to scan your computer
To scan any file or folder on your computer, let's go to the path where the item to be scanned is present (from File Explorer), right click on it then select the item Analyze with Microsoft Defender.
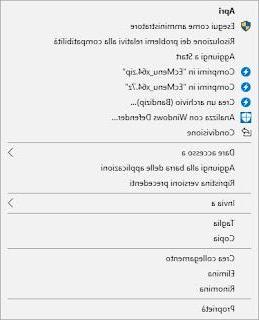
If, on the other hand, we wish start a quick scan of your computer with Microsoft Defender, we right-click on the icon Windows security at the bottom right (it could be a hidden icon, in this case just click on the arrowhead present) and select Run the quick analysis.

This type of scan will immediately analyze all the most critical areas, where it is highly likely that a virus can hide (Registry, system boot, folder Windowsposter Programs).
If, on the other hand, we want to start a complete scan of the computer (slower, since all personal files and any disks connected to the PC are also scanned) let's go to Settings -> Update & Security -> Windows Security -> Virus & Threat Protection, click on the item Analysis options, we select Comprehensive analysis then click on below Start analysis.
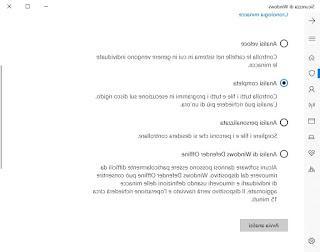
Alternatively we can also start a custom scan and choose the areas to scan (with the voice Personalized analysis) or an offline scan, to be used for the toughest malware that hides and camouflages itself, which is not eliminated by normal scanning (with the voice Microsoft Defender Offline Analysis).
In another article the guide to Microsoft Defender Offline, the built-in tool that scans your PC when you start your computer, before loading Windows 10.
How to schedule automatic scanning
Microsoft Defender scans your computer regularly to keep it safe. To avoid slowing down your PC too much, the analysis is performed when we do not use the computer: to see it at work, therefore, simply leave the PC on but without activity (ie without moving the mouse) for at least 30 minutes, enough time to start the automatic optimization of Windows 10 (which also includes a quick scan with Microsofts Defender ). At the end of the scan, a warning window will appear, kept in the Notification Center even if we were away from the PC, with the summary of the scan and any viruses found.
If we want to start an automatic scan at a specific time of day or on a specific day of the week, we can program it by opening the Start menu at the bottom left, searching for and starting the program Scheduler.
From the window that opens, click on the top left Task Scheduler Library, let's take the path (with the various subfolders) Microsoft> Windows, click on the folder Windows Defender and subsequently on Windows Defender Scheduled Scan.
In the new window that we will see appear, click on the tab Activation and we press down on New.
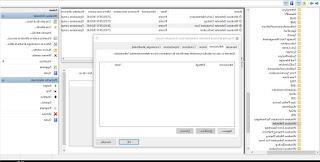
We now choose how often the scan should be performed, choosing the time and day.
It can also be schedule a scheduled scan using Powershell. From the Start menu, search for Powershell, then right-click on it and run it as administrator. Then, launch the following commands:
To schedule a daily quick scan: Set-MpPreference -ScanScheduleQuickScanTime TIME (put the time in place of TIME, for example 12:00:00). To schedule a weekly deep scaninstead, run the following commands by pressing enter after each one:
Set-MpPreference -ScanParameters 2
Set-MpPreference -RemediationScheduleDay DAY-NUMBER
Set-MpPreference -RemediationScheduleTime TIME The DAY-NUMBER must be a number between 1 and 7.
PLEASE NOTE- For added security, we recommend that you run at least a quick scan every week and a full scan every month.
How to activate advanced protection (anti-ransomware, sandbox etc.)
If we fear that the antivirus integrated in Windows 10 is not enough to protect our computer (perhaps because it is shared with other less experienced users), we can activate some additional protections, able to guarantee very high security (at the expense of performance and system usability).
To protect us from ransomware (ie from the viruses that block the PC and "take hostage" the user's files, asking us for money for the ransom), we can choose which folders must be protected from unauthorized changes by taking us to Settings -> Update & Security -> Windows Security -> Virus & Threat Protection and scrolling the page until you find the item Manage ransomware protection.
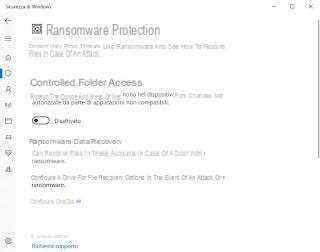
We activate the button under the section Controlled folder access, then click on the entry Protected folders. In the window that appears, we choose which folders to protect from ransomware (we recommend that you enter the folder immediately Documents and any other folders with personal files).
From now on, if the app is certified by Microsoft, it will be able to access protected folders without problems, while if it is not certified it will only be able to read the files, without being able to make changes. If a legitimate non-certified app needs to access protected folders, we can authorize it using voice Allow apps via controlled folder access -> Add app allowed.
We can also configure an online backup (on OneDrive) useful for restoring files that have ended up under ransomware attack, by clicking on the item Set up OneDrive.
To activate the Microsoft Edge sandbox (the default browser of Windows 10), let's get in Settings -> Update & Security -> Windows Security -> App and Browser Control, scroll down the page then click on the item Windows Defender Application Guard installation.
To protect ourselves from the most advanced exploits and Trojans, let's get in Settings -> Update & Security -> Windows Security -> App and Browser Control, scroll down the page and click Exploit protection settings; in the screen that will appear, make sure that all the items show Use default settings.
Finally, to protect ourselves from hacker attacks, let's get in Settings -> Update & Security -> Windows Security -> Device Security, click Core insulation details, then we activate the button under the section Integrity of memory.
Note: This feature may not be available with older processors.
How to exclude files from scanning
Even though Microsoft Defender is a very lightweight program, it still needs resources when it scans. To reduce this and also the duration of the scans, you can exclude certain files, file types or processes from virus scans.For example, it is useless to scan your photo collection if you are sure it has no viruses so you can exclude the entire folder.
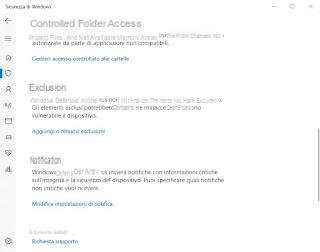
To be able to carry out the exclusion, it is sufficient to go to Settings -> Update & Security -> Windows Security -> Virus & Threat Protection, click on Manage settings and finally click Add or remove exclusions.
To learn more, we recommend that you read our guide on how exclude paths and folders from scanning and protection.
How to disable Microsoft Defender
Do we need to temporarily disable Microsoft Defender? Although this action is very dangerous for the integrity of Windows 10, we can perform it at any time by taking us in Settings -> Update & Security -> Windows Security -> Virus & Threat Protection, opening the menu Manage settings and removing the check mark from the items Real-time protection, Cloud-Provided Protection e Automatic submission of sample files.Windows will be fully exposed to threats, but will attempt to protect itself automatically by re-enabling real-time protection after a certain amount of time or after a system reboot.
If we are looking for a way to completely disable Microsoft Defender, we refer you to reading our guide on how Disable or remove Microsoft Defender in Windows 10.
NOTE: : if we choose to use another antivirus instead of Microsoft Defender, just restart the PC at the end of the installation to disable the integrated antivirus and use only the chosen third-party antivirus.
Conclusions
Microsoft Defender is a great antivirus for Windows 10, light, easy and safe. Given its characteristics, it is superfluous to install another antivirus on a computer with Windows 10, as Defender defends the computer very well.
However, if you want to install another type of security program, we recommend choosing the new antivirus from those recommended in our guide to Best Free Antivirus for PC.
If, on the other hand, we want to learn more about the other security tools integrated into Windows 10, we recommend that you read ours Guide to Microsoft Defender Security Center in Windows 10.
How to use Microsoft Defender antivirus in Windows 10


