How to use all Windows 10 32-bit RAM
Before even getting to the heart of the matter, I would like you to keep in mind a very important detail: you must know that, on the Net, there are some programs that allow you to easily free up your computer's RAM in just a few clicks.
However, as I explained to you in my tutorial on freeing up RAM, such software they are not useful for the purposes of this guide: they, in fact, allow you to close "on the fly" programs no longer in use, temporarily improving system performance, but not to expand the total amount of RAM available to Windows.
However, if it is your intention to take advantage of all the RAM on a computer that has Windows 10 32-bit, it is good that you are aware of some limitations of operating systems of this type.
Before explaining them, I suggest you make sure that the version of Windows 10 you have is actually 32-bit: this is a rather rare occurrence nowadays, especially on newer computers.
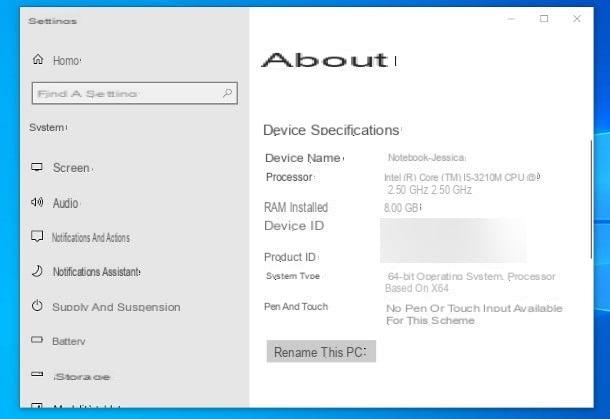
However, you can do this very easily: first, right-click on the Start button Windows (the icon in the form of pennant located in the lower left corner of the screen) and select the item System give the menu that you come purpose.
At this point, identify the section Device specifications and take a look at the wording System type to see if you are actually making a copy of the operating system to 32 bit.
If so, always through the same section, check the quantity of RAM installed on the system: If the total size of installed memory is 4 GB or more, Windows 10 will report usable memory only 3.5 GB.
Is this really your case? Then I think I have no good news for you: it might seem strange to you but, as I explained earlier, this behavior of Windows is perfectly normal, if the copy of the operating system is 32-bit.
It occurs due to a number of "natural" limitations of 32-bit operating systems which have always been unable to recognize amounts of memory greater than 4 GB (from which a small amount of space must be subtracted to be reserved for the exclusive use of the operating system).
Bypassing this limit is impossible, unless you install a 64-bit copy of Windows from scratch, which can properly handle much more RAM. In order to do this, however, a 64-bit processor.
You can easily check this condition again via the system properties screen (the one you opened earlier), by taking a look at the entry System type: if the CPU is 64-bit, you should find, immediately after the description of the Windows version, the words x64-based processor.
Once this has been checked, all you have to do is download the Windows 10 ISO using the official tool provided by Microsoft, create the most suitable installation media for your case (USB or DVD) and proceed with the installation of the operating system, having take care to choose, when necessary, the version to 64 bit. In this regard, my guides on how to download Windows 10 and how to install Windows 10 may be useful.
How to use all Windows 10 64-bit RAM

How do you say? You did not find the information I have given you useful, because it is installed on your computer Windows 10 64-bit? Then, in all likelihood, the cause of not using all the RAM memory is to be found elsewhere. Below, I will illustrate the most common conditions in which this happens and the remedies to apply when they occur.
Also in this case, as I explained earlier, the so-called RAM-free programs are to be avoided, i.e. those that, in just a click, allow you to empty the operating system memory: they allow you to temporarily improve the performance of Windows, but not to increase the amount of RAM that the operating system can handle.
Eliminate startup limits

In some cases, the amount of RAM to dedicate to Windows 10 may have been limited by operating system startup settings same. Fixing this problem is not difficult at all: you need to access the Windows boot settings and disable the option relating to restrictions on the memory to use.
To do this, press the key combination Win + R (or open the Start menu or, again, the Cortana search bar), type the command msconfig in the text field that appears on the screen and press the key Submit on the keyboard.
Once in the new window, click on the tab Boot options (top), press the button Advanced options… and remove the check mark from the box Memory Max. Finally, close all open windows by pressing the key OK, and restart your computer.
If everything went well, the problem should be solved: to make sure, right-click on the Start button Windows 10, choose the item System from the menu that appears and check that the amount of RAM used is equal to the amount of memory installed in the PC.
Decrease the memory dedicated to the video card

Another reason why you may not be able to use all the RAM on 10-bit Windows 64 could be to use one integrated video card: since it does not have dedicated memory, it uses the computer's RAM to quickly exchange data with the CPU.
In general, integrated video cards "gnaw" from 8 to 128 MB of RAM, a rather small amount which, however, can affect the performance of computers with low memory (2 GB or less).
If necessary, you can decrease the memory dedicated to the video card to the smallest possible value (usually 8 MB) by adjusting the computer's BIOS / UEFI settings. In this case, however, you may experience some slowdown when using programs that require a modest video processing speed.
With that clarified, it's time to take action: to access the UEFI settings, open the menu Home Windows 10 and pressing and holding the key Shift / Shift on the keyboard, click on the button Stop and then on the voice Reboot the system.
After a few seconds, you should see the menu with the operating system boot and recovery options. When this happens, click on the icons Troubleshooting, Advanced options e UEFI firmware settings. Finally, click the button Restart and wait for the computer to restart.
If you are unable to access UEFI using the above procedure, it is very likely that the BIOS, the "previous" version of the computer's initial manager, is present on the PC. In this case, you can put into practice an alternative procedure and call the manager when starting up the computer.

To be able to do it, turn on the PC and, after the manufacturer logo appears (but before Windows starts), repeatedly press the key Canc or il tasto F2 keyboard until the BIOS screen appears. However, keep in mind that the combination of keys to press may vary depending on the manufacturer of the computer: if those reported above prove to be ineffective, you can try replacing the Del or F2 keys with the keys F6, F9 o F10.
If you have problems accessing the UEFI or BIOS, I invite you to consult my guide on how to enter the BIOS on Windows 10, in which I have covered this topic in even more detail.
Once you enter the UEFI or BIOS, you will find yourself faced with a series of settings related to the management of the peripherals installed in the computer (disks, processors, video cards, integrated network cards, and so on).
To access the memory shared with the video card, access the section Advanced Setup (Advanced Settings) and, from there, enter the area Onboard Devices Configuration (Integrated device configuration).
After pressing the button Submit, to access the appropriate section, select the item Shared Memory Size / Shared Video Memory Size (o Shared video memory) and, using the key [-], decrease the amount of video memory taken from RAM to the amount you want (the minimum is 8 MB).
Once the modification is complete, all you have to do is save the changes and exit the BIOS / UEFI: to do this, return to the home screen by pressing the key several times Esc and select the item Save & Exit setup from the displayed menu, or press the save key (usually F10).
For further clarification on the subject, you may find the information in my tutorial on how to dedicate the RAM to the video card useful.
Note: On some computers, you may be able to use UEFI using the mouse.
Check the integrity of the RAM memory

How do you say? Have you scrupulously followed the information I gave you throughout this guide but, unfortunately, is the problem still there?
As a last resort, I recommend that you check that all RAM banks installed on your computer are working properly. In this regard, you can rely on Memtest86: a free program that can be used from CD or USB, able to analyze and detect any problems connected to the RAM memory.
To use it, connect to this website and click on the link Download - Pre-CompiLED Bootable ISO (.zip) corresponding to the latest software version.
Once you have the Memtest86 package, extract it to a folder of your choice and "burn" theISO image contained in it on a USB stick, using a program such as UNetbootin. If you don't know how to do it, you can stick to the directions I gave you in my guide on how to burn ISO to USB.
Alternatively, you can burn the Memtest86 image to a CD as well, using the procedure of Windows Burning Wizard: right click on the ISO image extracted previously and select the entry Burn from the proposed menu. Next, insert a blank CD into your computer drive and click the button Burn to start the process right away.
Once the media has been created, leave it connected to the computer and restart it: in most cases, Memtest86 should start automatically instead of Windows. If this does not happen, restart your computer again, log in to BIOS / UEFI and set boot from USB or CD. If you can't do this on your own, my guide on how to set up the BIOS might come in handy.
Once you have started Memtest86, you do not have to do anything else: the software will automatically execute some tests to verify the correct functioning of the RAM memory. In case of errors, you will see text highlighted in red, indicating information about the memory area and the type of test failed.
To exit Memtest86, simply restart your computer, taking care to remove the media used for running the program. To proceed, press the button at any time ESC of the keyboard.
If the results of the tests are positive for errors, it is very likely that the failure to read the RAM memory is due to a malfunction of the same: in this case, you could consider purchasing a new memory bank.
Do not worry, I do not intend to leave you alone at this stage: if you need advice regarding the choice of the new memory module, feel free to consult my guide on which RAM to buy, made just to meet this need.
How to use all Windows 10 RAM


