Were you doing some cleaning in the "camera roll" of your Samsung smartphone and accidentally deleted some photos that you didn't want to delete? Don't despair, the last word is not yet spoken. If the portion of memory on which the images were stored has not yet been occupied by new data, you have a good chance of being able to recover your shots.
There are various applications that can be used to do this, some of which you can use directly on your mobile phone and others that you can download to your PC. They work with all major Android smartphones and can work both on the internal memory of the device and on microSD cards (if you have a smartphone with expandable memory). Their degree of effectiveness is quite good but - it's always good to point out - they don't work miracles. The results they achieve depend exclusively on the state of the memories examined.
What else to add? If I were you, I wouldn't waste any more time and I would immediately try to recover deleted photos from Samsung using one of the softwares listed below. In cases like these every second can be vital for the recovery or permanent loss of an image!
Preliminary steps
Before we get into the heart of the tutorial and find out how to recover deleted photos from Samsung devices, let me give you a couple of "tips" that might help you get your photos back without resorting to data recovery software.
Restore photos from Google Photos
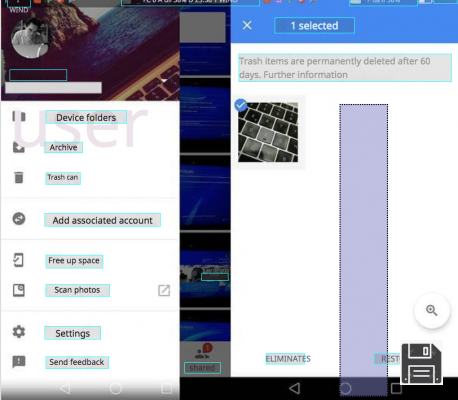
As trivial as it may seem, the first tip I feel like giving you is to open Google Photos and check if the photos you're desperately trying to recover aren't stored in the app's trash. Google Photos, in fact, moves all deleted photos in a temporary folder (called the Recycle Bin) that keeps them for 60 days and only then deletes them permanently, both from the phone memory and from Google Drive.
To access the Google Photo Recycle Bin, simply launch the application, click on the icon at the top left and select the item Recycle Bin from the sidebar on the left . Then scroll through the list of images in the folder, select the ones you want to recover by keeping your finger pressed on their thumbnails and restore them by clicking the arrow that appears in the upper right corner.
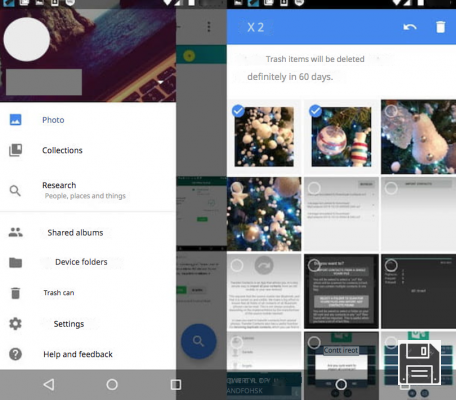
If you have enabled online photo synchronization (which I strongly recommend you to do) you can also recover your photos via PC, using the web version of Google Photos.
All you have to do is open the browser, connect to the home page of the service, click on the button at the top left and select the item Trash in the sidebar on the left. At this point, you have to select the thumbnails of the photos to be recovered by clicking on them and you have to click on the arrow icon that appears at the top right. The recovered photos will be returned to the main Google Photos album.

Restore backups from Smart Switch
If you use Smart Switch, Samsung's official app for syncing Android devices with your computer, and you created a backup of your smartphone or tablet before deleting the photos, you can use it to restore your device to a previous state and then restore the photos you deleted.

To restore a backup with Samsung Smart Switch, connect your smartphone or tablet to your computer, launch the program and click first on the Restore button and then on Restore Now to start restoring your data (including photos). If you have more than one backup saved on your PC and/or you want to select more precisely the data to be restored, after clicking the Restore button, choose the Select a different backup folder option, choose Samsung device data from the drop-down menu located at the top left, choose the backup you're interested in from the other drop-down menu and make sure that the check mark is next to Images. Then click OK and Restore Now and you're done.
Apps to recover deleted photos from Samsung
If you haven't managed to recover your photos via Google Photos or Smart Switch, you'll need to move on to more advanced solutions, such as deleted data recovery apps that work directly from Android: here are a couple of the most effective ones.
DiskDigger
When you want to recover deleted files, you have to make sure that the portion of memory on which the data was hosted is not occupied by other information. This means that you shouldn't have to install any new software, but I can't help but recommend DiskDigger, a free Android app that has helped me recover photos that seemed lost forever.
Of course, like all such apps, it doesn't work miracles. It can only recover images if the memory areas that housed them have not been rewritten, but I feel I can say that it is one of the best in its field. And above all it's one of the easiest to use since it works directly from Android. Its only real flaw (if we can call it that) is that it expresses itself at its full potential only on devices subject to the root procedure. Otherwise it can only perform a limited scan and recover very few images. If you don't know how to root your Android and want more information about it, check out my tutorial on the subject.
So, what do you think? Would you like to try out this app? Good. To use DiskDigger, download the app from the Google Play Store and launch it. Click on the Grant button that appears in the middle of the screen to grant administrator rights to DiskDigger (this is necessary only if you have a smartphone that has undergone the root procedure), answer No, thanks to the request to upgrade to the paid version of the application (which allows you to recover other types of files in addition to photos) and wait a few moments to examine the memory of the smartphone.
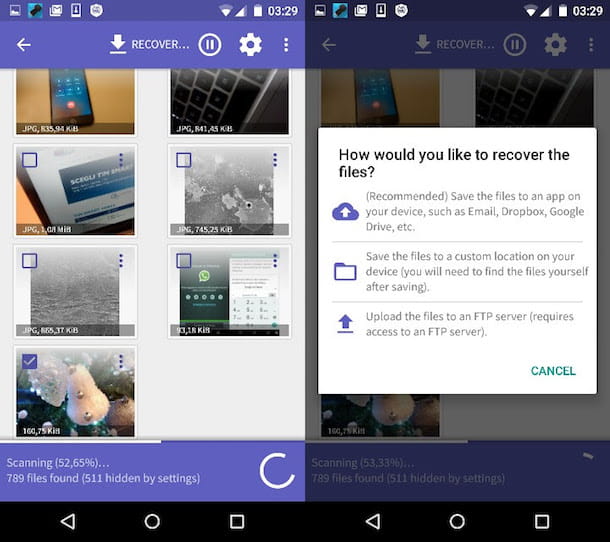
At this point, select the item related to the internal memory of your mobile phone (e.g. /data) or the SD card on which the deleted photos were stored, put a check mark next to the item JPG and click on the OK button to start the search for recovered photos.

Once the scan is complete (it may take quite some time), select the thumbnails of the images to be restored, press the Recover button located in the upper right corner and choose how to recover deleted photos from Samsung: you can export the images to one of the applications installed on your smartphone (e.g. Dropbox, your email client, etc.) by clicking on the cloud icon; or you can save the images directly to the smartphone memory, in a location of your choice, by selecting the folder icon.
If, in addition to photos taken with your smartphone's camera, you want to try to recover screenshots, images contained in your browsing history or images from various apps, on the DiskDigger home screen also check the box next to PNG. GIFs, TIFFs and other image formats can only be searched with the Pro version of the app, which costs €3.37.
Undeleter
If DiskDigger failed to recover the photos of your interest, you can try Undeleter: it is an application for the recovery of deleted data that allows you to restore photos at no cost. There's also a paid version (€6.49, to be unlocked via in-app purchase) that adds support for files other than images, but for now I'd say you're not interested. Just like DiskDigger, Undeleter is at its best when used on a rooted device, so if you haven't already done so, root your Android.
After installing Undeleter from the Google Play Store, launch the app, tap on the Next button and grant it root permissions by tapping on the Grant button. At this point, click on Next again, choose the Restore files option and select thedrive from which you want to recover the photos (e.g. Internal storage for the internal memory of the device).

On the screen that opens, select the Deep Scan option, check the JPG and/or PNG boxes (depending on whether you want to recover only the photos you took with the camera or also screenshots and other image types) and click the Scan button to start searching for the files that can still be recovered.
Once the scan is complete, locate the thumbnails of the photos you want to recover, select them by holding your finger on them, click the (...) button in the top right corner and select Save File from the menu that appears to choose the output location and recover the selected photos. As a general rule, it would be advisable not to save the photos on the scanned drive, so if you have a device with expandable memory and you searched for photos on the SD, try to save the photos to the internal storage.

Recover deleted photos from Samsung using PC
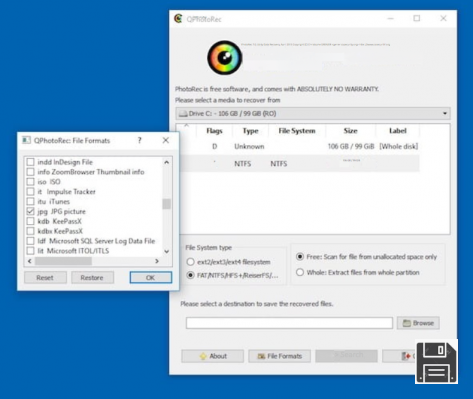
If your smartphone is equipped with expandable memory, and therefore the deleted photos were on the MicroSD installed in the device, you can insert the card into your computer and attempt image recovery with PhotoRec: a free, open source, cross-platform application that allows you to recover data from drives/partitions formatted with all popular file systems. It comes bundled with TestDisk, another free app that is used to restore lost partitions and make damaged disks bootable again.
To download PhotoRec (and TestDisk) to your computer, go to the software's official website and click on the link for the operating system installed on your computer. In this tutorial I'm going to focus on Windows, which is the only operating system for which PhotoRec comes complete with a graphical user interface (on macOS, for example, it must be used from the command line).
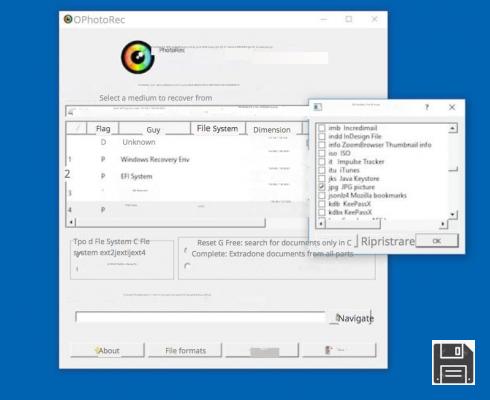
Once the download is complete, open the zip archive you've just downloaded on your PC, extract the contents into any folder and run the qphotorec_win.exe file. In the window that opens, expand the drop-down menu at the top to select your computer's SD drive (or USB drive, if you used a USB adapter to insert the microSD into your PC). Then choose the primary partition of the microSD (it should be the one named FAT32 or exFAT), tick the FAT/NTFS/HFS+/ReiferFS and Free boxes and click the Browse button to choose the folder where you want to save the recovered photos from the card.
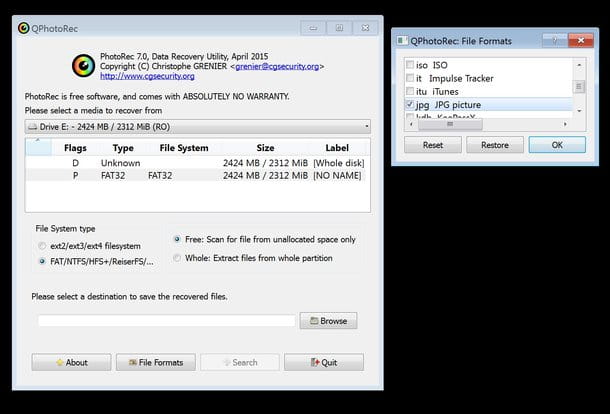
Now you need to choose the file types you want to recover. Then click on the File formats button, press Reset to clear the default selection and check the JPG item only (assuming you only want to recover photos taken with your phone's camera, otherwise also select PNG and other file formats you're interested in).
When you're done, click OK and Search, wait for the program to do its work (it may take a while) and open the output folder you selected earlier to find out if the photos recovered by PhotoRec include the ones you're interested in.
If you have a Mac and you need to use PhotoRec via the command line, do this.
- Open the tar.bz2 archive you downloaded from the PhotoRec website, extract the content into any folder and run the executable photorec by right-clicking on its icon and selecting Open from the menu that appears;
- In the window that opens (the Terminal), press the right arrow on your keyboard to select the Sudo option, press Enter and type the password for your macOS user account;
- Use the keyboard to select thedrive from which you want to recover photos, specify the partition you want to focus on and the file system it is formatted with(Other for partitions formatted in NTFS, FAT and HFS+) and choose the Free option;
- Select the destination folder where you want to save the recovered photos, press the C key on your keyboard and wait patiently for the end of the data recovery process.

PhotoRec may also work with smartphones that do not have expandable memory (i.e. save photos directly to their internal memory). If you have such a phone, though, before connecting it to your PC, unlock the developer options and enable USB debugging. If you don't know how to do that, you have to go to the Settings > About phone menu, you have to tap on the Buid number seven times in a row and you have to select USB Debugging from the Developer options menu.
In case PhotoRec is not able to detect the internal memory of your smartphone, make sure you have the right drivers installed on your PC (just check if the device is accessible from My Computer). If so, I'm sorry, but you have one of those phones that protect access to the internal memory and therefore don't allow PhotoRec to do its job. To bypass the problem you could create an image of the internal memory of your smartphone, convert it into a VHD file and feed it to PhotoRec, but this is a quite long procedure and it doesn't seem to work with the latest Android devices. To learn more, read this tutorial available on the XDA website... or, better yet, have one of your tech-savvy friends read it: I'm sure they'll know how to make good use of it!


