Use a Windows 10 PC as a WiFi router
A PC equipped with Windows 10 and the latter includes a network card compatible with guest mode, i.e. with Internet connection sharing, you can turn your computer into a wireless access point without the need for third-party software. All you have to do is open the Command Prompt, activate the hosted network mode of the network card by giving some simple commands that we are about to discover together, and activate the connection sharing in the control panel.
The very first step you need to take, however, is another: check the compatibility of the network card in the PC with the hosted network mode. Then open the Command Prompt typing cmd in the search bar of the Start menu and pressing the key Submit on the PC keyboard. Then give the command NETSH WLAN show drivers and check the output that is provided to you: if next to the wording Guest network supported it says Yes, your network card supports hosted network mode and you can go on with the procedure. If not, I'm sorry, but you can't continue.
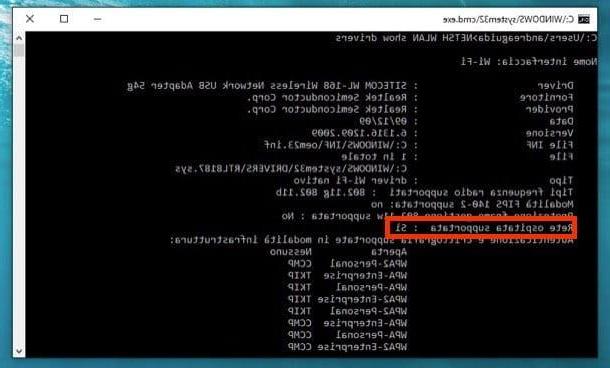
After checking the compatibility of your network card with hosted network mode, keep Command Prompt open and enable the aforementioned mode. To do this you have to give two commands.
- NETSH WLAN set hostednetwork mode = allow ssid = name key = key (where instead of "name" and "key" you have to type the name you want to assign to the network to be generated with the PC and the password you want to use to access it). If the command is successful, you will receive as output the message “Hosted network mode has been enabled. The SSID of the hosted network has been changed. Hosted network user key passphrase has been changed ”.
- NETSH WLAN start hostednetwork. If the command is successful, you will receive the message “Hosted network started” as output.
At this point, you just have to enter the control panel and activate the sharing of the network of your interest. Then click on the button Home (the Windows flag located in the lower left corner of the screen), search for terms network connections in the search bar and select View network connections from the search results.
In the window that opens, right-click the connection you want to share (eg. Local Area Connection (LAN)) and choose the item Property give the menu answer.
Next, select the tab sharing from the window that opens, put the check mark next to the item Allow other network users to connect via this computer's Internet connection and select the name of the network adapter to use for sharing (ex. Wi-Fi) from the drop-down menu Home network connection.

Mission accomplished! Now your PC has become a wireless access point and can share its Internet connection with other devices. To use its network, all you have to do is select it from the list of available networks and type the access key you have chosen in the Command Prompt.
When you have finished using the network, to deactivate connection sharing, open the Command Prompt e dai il command NETSH WLAN stop hostednetwork. To reactivate the connection, however, the command to be given is NETSH WLAN start hostednetwork. The other steps seen above only need to be performed the first time you configure the hosted network.
Use a PC with Windows 7 / 8.x as a WiFi router
If you have a computer equipped with Windows 8.x o Windows 7 and you want to find out how to use your PC as a WiFi router, download Virtual Router. It is a free and open source program that without any complicated configuration allows you to share the connection in use on your computer wirelessly.
Using it, you can create a secure wireless network, with a name and password chosen by you, accessible from any device: computer, smartphone, tablet, video game console, etc. If you want to try it, connect immediately to its website and click on the button download for free. Then start the software installation package (VirtualRouterInstaller.msi) and first click on Next three consecutive times and then on Yes e Close to finish the setup.

If you are notified of the lack of . Net Framework 3.5 on your computer (a Microsoft software essential for the operation of the application), download it from this web page. All you have to do is click first on Download and then No thanks. Keep it going.
Once the download is complete, start the installation package dotnetfx35setup.exe click her cousin Yes and then Download and install this feature to complete the setup. Then open the Virtual Router installer again and proceed as explained above.
Mission accomplished! Now all you have to do is start Virtual Router through its icon that appears in the Start menu and fill in the form that is proposed to you with the information on the wireless network to be created.

Then use the drop-down menu Shared connection to select the connection to share (in your case Ethernet but wireless connections can also be shared), type the name you want to assign to the network in the field Network name Password to use to protect it in the appropriate text field and press Start Virtual Router to start sharing the Internet connection.
When you have finished working, you can close the wireless network generated by Virtual Router by calling up the main program window and clicking on the button Stop Virtual Router. Quick and easy.
Use a Mac as a WiFi router
I use a Mac? Don't despair. You can too use your computer as a WiFi router and you can even do it without resorting to third-party applications.
All you have to do is open System preference, click on the icon sharing I will select the voice Internet sharing from the side bar of the sinistra.
At this point, choose from the menu Share your connection from the type of connection you want to share (in your case Ethernet), metti il segno di spunta accanto alla voce Wi-Fi in the box located at the bottom right and set a password to protect your wireless network by pressing the button Wi-Fi options. In the window that opens, select the item WPA2 Personal give menu to tendin Safety and type in the password to protect the network.

So tick next to the voice Internet sharing in the left sidebar and press the button starts to start sharing the Internet connection.
When you're done working, you can turn off your Mac's wireless connection by going back to System preferenceby clicking on the icon sharing and removing the check from the item Internet sharing.
How to use your PC as a WiFi router


