How to use PowerDirector on PC
All you need to do to use PowerDirector is to download the program on your computer (it is only available for Windows PC), choose one of the available editing modes and import the contents of your interest. How to do? I'll explain it to you right away!
How to download PowerDirector
PowerDirector is a paid program: various plans are available with prices starting from 51,99 euros / year or 19,99 euros / month, but a trial version is available that allows you to test its operation for 30 days.
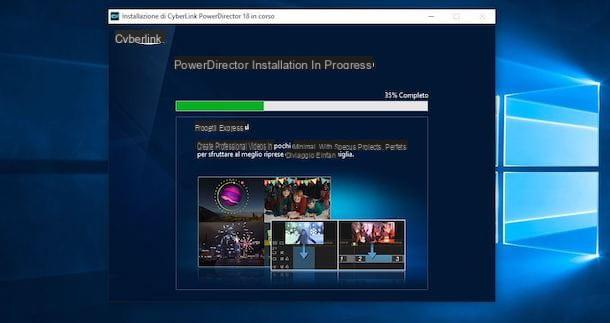
To download the trial version of PowerDirector on your computer, then connect to the official website of the software and click on the button Free download. Once the download is complete, double-click the file CyberLink_PowerDirector_Downloader.exe obtained and press the button Start, to start downloading the files necessary for the program to work.
At this point, select the option Install nowclick on your button Yes, to allow the program to make changes to your computer, select the language of your interest (eg. cityno) through the appropriate drop-down menu and press the button NEXT, then select the option Accept, wait for the progress bar to reach 100% and click on the button Start PowerDirector, to complete the installation and start the program.
In the new screen that appears, select the option Quick registration, enter the data to be associated with your account in the fields Email e Password, put the check mark next to the item I am over 16 and accept the privacy policy and click on the button Register now, to complete the registration. Now, access your inbox, locate the email sent by CyberLink (the PowerDirector manufacturer) and press on the item Activate your profile, to verify your identity and activate your account.
Finally, go back to PowerDirector, click on the button Log in, enter the data previously created in the fields Email e Password e premi sui pulsnti Log in e Accetta and continue, to start using PowerDirector.
How to create a new project with PowerDirector

To create your first project with PowerDirector, first choose the format of your interest among PM16:9, PM4:3, PM9:16, PM1:1 e 360 °, then select the design mode you prefer: Full mode allows you to use all the features of the program, to create / edit videos taking care of every detail; Storyboard mode to create a storyboard with videos and images; Presentation author to create a dynamic slideshow of photos or Automatic mode to create a project by selecting the elements of your interest and choosing a style from those available.
To explain in detail the features of PowerDirector, I will refer to the Full mode. After choosing the option in question, select the item Media imports (l'icona della arrow and a folder), to start importing the content of your interest, and choose one of the available voices among Import media files, to import single files, and Import media folder, to import multiple items at the same time.
It will be useful to know that by selecting the item Media content and choosing the option of your interest (Color palettes, Background images, Background music, Audio clip etc.) you can also choose PowerDirector images, wallpapers, sound effects and music tracks. Also, by clicking on the option Acquisition you can acquire files from external devices connected to your computer.
Regardless of the elements you intend to use for your project, all you have to do to add them to the workspace is to drag them into the PowerDirector timeline. At this point, by right clicking on each single item available in the workspace, you can apply both audio and video changes. Alternatively, you can select one of the options visible above the program timeline.
For example, if your intention is to edit a video, after adding it to the workspace and selecting it, you can choose the option Correct / Enhance to adjust the brightness, stabilize the video, eliminate background noises and much more. By choosing the option instead Instruments you can adjust the speed of the movie, to apply cuts and access the section Audio editor in which you can manage everything related to the sound aspect of the video (Volume, Distortion, Adjustments etc.).

In addition to importing new items, from the section Modification of PowerDirector you can also apply effects and enhancements to your projects by choosing one of the tools available on the left: Aera effects allows you to choose and use one of the more than 100 available effects; Video overlay area collects over 30 effects that can be superimposed on other elements; Title area allows you to add text to your project; Transitions area allows you to use transition effects between one element and another; Audio mixing area allows you to adjust the volume of voice, music and other audio effects; Voiceover recording area allows you to make recordings on the spot; Chapter area allows you to automatically set chapters in your project e Subtitle area allows you to create and add subtitles.
After completing the creation of your project, you can move on to the production phase, to export it to your computer. To do this, select the option produce from the menu located at the top, choose the video format of your interest between REVIEWS, MPEG, AVC etc. or click on the icon two musical notes, to choose an audio format (WMA, M4A, WAV). Alternatively, click the button Profile analyzer, to start analyzing your project and get advice on which format to choose.

Made your choice, indicate the export folder and click on the button Start, to start the export. Wait, then, for the progress bar to reach 100% and that's it.
It will be useful to know that you can also share your movie online, without exporting it to your computer. If so, select the items produce e Online, choose the platform of your interest (YouTube, Vimeo e Dailymotion), insert title, Description, tag e category of the movie, set its privacy (Public o Private) and click on the buttons Start e Authorize, to log into your account of the chosen platform and start uploading the video.
How to activate PowerDirector

As mentioned in the initial lines of this guide, by downloading the trial version of PowerDirector it is possible to use the program in question for free for 30 days, albeit with some limitations (eg the PowerDirector logo is applied to the exported videos).
You can activate the full version of PowerDirector at any time, choosing whether to purchase one of the available licenses or activate a subscription plan. In the first case, you should know that two different types of licenses are available: PowerDirector Ultra (99,99 euros) e PowerDirector Ultimate (129,99 euros). The latter also allows the capture of professional video formats and advanced video editing features (e.g. the ability to view editing previews in 4K).
As for the available subscriptions, you can choose between PowerDirector 365 (19,99 euros / month or 51,99 euros / year) e Director Suite 365 (29,99 euros / month or 96,99 euros / year). The only differences between the two subscriptions is that Director Suite 365, in addition to offering a cloud storage space of 100 GB (compared to 50 GB of PowerDirector 365), also allows you to use the other CyberLink software (PhotoDirector, AudioDirector e ColorDirector).
All you have to do to purchase a PowerDirector license or activate one of the available subscriptions is to connect to the official website of the program and click on the button Buy Now related to the option of your interest. Once this is done, enter your details in the fields Email, Tax Code, Your name, Last name, POSTAL CODE e City and click on the button Go to the checkout, then select the payment method you prefer (credit card, PayPal o Bank), enter the data in the appropriate fields and press the button Buy it now, to complete your purchase and receive instructions to activate the full version of PowerDirector.
How to use PowerDirector on smartphones and tablets
If you are wondering if it is possible use PowerDirector on smartphones and tablets, you will be glad to know that the answer is positive. In fact, the program in question is also available as an application for Android and iPhone / iPad devices, albeit with some limitations compared to the computer version.
How to activate PowerDirector Premium

Before explaining to you how to use PowerDirector on smartphones and tablets, you might find it useful to know what the differences are between the free version and the paid version of the app and the detailed procedure to activate the Premium version.
The free version of PowerDirector allows you to create single track projects and access a catalog of limited media content. It also features banner ads and watermarks (the application logo) on each exported video.
By activating a Premium subscription (5,49 euro / month, 3,66 euros / month for three months o 37,99 euros per year), on the other hand, it is possible to “unlock” multiple tracks, remove advertising banners and watermarks from saved videos and have access to a multimedia catalog that has over 700 contents including audio effects and background music.
It will be useful to know that by activating the PowerDirector annual subscription it is possible to test the features of the Premium version free of charge for 7 days and without any renewal obligation. If you are interested in activating the free trial, start PowerDirector, tap the del icon cartat the top right, and select the option Try free for 7 days with an annual subscription.
At the end of the free trial, the subscription will automatically renew: if you do not want to continue using the Premium version of PowerDirector or you have already activated one of the paid subscriptions and want to cancel its automatic renewal, you should know that the procedure for deactivation varies depending on the device in use.
If you have a device Android, start the Play Store, press the ☰ button, top left, and choose the option Subscriptions from the menu that opens. Therefore, identify PowerDirector, click on the relevant button Cancel subscription and confirm your intention by clicking on the items Continue e Cancel subscription.
If, on the other hand, you have a iPhone / iPad, avvia l 'App Store, your prize photoat the top right, and select the option Subscriptions. In the new screen that appears, tap on the subscription of PowerDirector, select the voice Cancel subscription And that's it.
How to create a new project with PowerDirector

To create a new project with PowerDirector, start the app in question and, if it is your first access, tap the buttons Accetta and continue e Allow, to allow PowerDirector to access the multimedia contents of your device.
At this point, choose the option New project, enter its name in the field Project name and select one of the available options from PM16:9, PM9:16 e PM1:1, to specify the aspect ratio of the video to be created and access the PowerDirector workspace.
In the new screen that appears, to start importing the content to use in your project, select one of the options available in the menu located at the top. For example, if you want to add a video, tap the icon of video camera and press on the item of your interest: Video capture to make a movie in real time; Google Drive/Fillet to import a video from Google Drive (on Android) or from File (on iPhone / iPad); Color palette to add a colorful background to your project or Recent (or the name of the folder you are interested in) to upload the videos available on your device.
If, on the other hand, you want to import a photo or image into the PowerDirector timeline, tap the landscape, at the top, and choose the option of your interest from Photo capture to take a photo on the spot; Google Drive / File to import an image from Google Drive or File; Color palette to use a colored background for your project e Recent (or the name of a certain folder) to select a photo from the Gallery of your device.
Also, by pressing the icon of the music note, you can select one of the available options and add audio content to your project. Choosing the voice Music and sound clips, you can access the catalog that has over 700 ready-to-use multimedia contents, such as songs divided by musical genres (Country, Jazz, Orchestral, Pop, classical, Electronics, Piano, Rock etc.) and sound effects (Pets, Ambient audio, Sport, Transportation, Musical jingles, Instruments etc.).
Alternatively, you can upload custom audio content from both your device (including music) and from Google Drive on Android and from Files on iPhone / iPad. By pressing, instead, on the option Sound commentary, you can record audio on the fly and automatically add it to your project.

After choosing the content of your interest, all you have to do to import it into the PowerDirector timeline is to press the relevant button +. If you have chosen an audio content in the section Music and sound clips, you must first press the icon of nuvola, in order to start the download of the content and, subsequently, you have to press the button +, to add it to your project timeline.
By pressing the ▶ ︎ button, at the top right, you can access the main screen of the PowerDirector editor from where you can edit your project, add effects and new content, manage audio settings and much more using the commands visible on the left and right .
If your intention is to add a title to your project, click on the icon rhombus, on the left, select the option Title and choose the option you prefer from default, Glitter, Final acknowledgments, Spiral, Grouped, Overturning, Videos etc. Then press the button + for the chosen title, to add it to the PowerDirector timeline, tap the title in question and press the icon of pencil, to customize the content of the title, choose the colore size and character.
To add an effect, instead, press on the voice FX, on the left, choose the one you are interested in (Bianco e nero, Flowering, Relief, Pouring, Chinese painting etc.) and press the relevant ▶ ︎ button, to see a preview. If you like it, you can press the button + (or drag it to the timeline), to apply it to the content of your choice (e.g. a video or a photo).
I point out that you can also add stickers on your content, by pressing the icon of rhombus, on the left, by selecting the option Wall Stickers e facendo tap sul pulsating + related to what you intend to use. Furthermore, at any time, you can add additional multimedia content to your project (video, photos, audio) by pressing the icon of music note, to the left.
If, on the other hand, you want to modify an element that you have already inserted in the timeline of your project, all you have to do is press on theelement of your interest, tap on the icon of pencil and choose one of the available options (Volume, Cut out, Duplicate, Speed, Rotation, Color, Sharpness, Overturning etc.). By pressing, instead, on the icon of basket, you can remove the item in question from the PowerDirector timeline.

It will be useful to know that you can save your project at any time by clicking on the icon arrow, at the top right, and choosing the option Save project. If, on the other hand, you want to export your video, click on the item Produce video, select the option Save to gallery, put the check mark next to the video resolution of your interest (Ultra HD, Full HD, HD 720p e SD 360p e fai tap sul pulsating produce, to save the video to your device.
Alternatively, you can upload the video in question to Facebook and / or YouTube by selecting the option you prefer between Share on Facebook e Share on YouTube.
How to manage projects with PowerDirector

All created and saved projects are visible on the PowerDirector main screen. If you have saved a project and now you want to resume work and apply further changes, press on the project of your interest and tap on the item Edit project.
Selecting, invece, l'opzione Produce video you can start exporting the movie in question or uploading it to Facebook / YouTube, while pressing on the item Save eat you can duplicate the selected project.
How do you say? Do you want to permanently delete a project from PowerDirector? In that case you just need to select the project to delete, choose the option Delete project e premere sul pulsating OK, to confirm your intention and permanently cancel the project in question.
Finally, I point out that, if you have a device Android, you can upload / download a project from Google Drive. In that case, all you have to do is press on the item Upload / download project package visible on the PowerDirector main screen and choose your Google account.
Fatto ciò, first prize Charge, to save a project on Google Drive, or select the project you want to download and tap on its icon freccia rivolta verse il basso, to start the download.
How to use PowerDirector


