How to install FileZilla
As I already mentioned to you a little while ago, fileZilla is a program available for both the Windows and macOS operating systems. Although both versions of the software are almost identical, the installation procedures differ slightly, so below I will explain how to setup the program on both platforms.
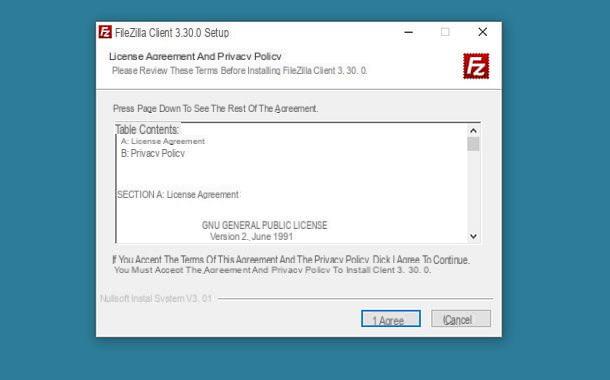
For Windows, the first thing you need to do is connect to the FileZilla download page and press the button first Download FileZilla Client and then on the button Download. Once this is done, start the file you just downloaded, press the buttons Yes e I Agree, then four times on the button Next, remove the check mark from the box I agree to install Avast Antivirus (to avoid the automatic installation of the attached program), press again on Next, remove the check mark from the box I agree to install Reason Core Security and finally, click on the buttons Next e Finish. When the program opens, press the button OK.
If, on the other hand, you have a Mac and therefore the operating system MacOS, proceed as follows: connected to this website, click on the button Download FileZilla Client, by pressing the button Download, and wait for the file to be copied to your computer.
At this point, start the installer you just downloaded and press the button Agree, then do Double-click on the FileZilla logo that appears in the center of the proposed panel, click on the buttons apri, Continue, Salta and complete the procedure by pressing the button Finish. When the program starts automatically, press the button OK in the new panel that appears and that's it.

Please note: Always pay close attention to the various windows shown during FileZilla installation, as the steps to avoid downloading additional programs may change at any time.
How to add an FTP account in FileZilla

Now that you've finally installed FileZilla on your computer, it's time to learn how to use it. From this point on, I'll refer to FileZilla for Windows: the instructions, as I have already briefly explained to you a little while ago, are still valid for MacOS, as the two versions of the program are practically the same.
Having made this necessary premise, it's time to take action: the first thing you need to do is to configure theFTP account related to the web space on which you want to upload your data. Just to be clear, FTP it's a file transfer protocol, which is a "way" in which programs move data from one connected computer to another.
The FTP protocol is a client-server protocol, in which it acts through two main “programs”: the FTP server is the software capable of receive data using the aforementioned transfer method, for example the server on which your new domain is hosted; the FTP client, on the other hand, it is the program that takes care of connecting and transmit the data to the FTP server.
Having clarified this, the first thing you need to do to transfer your files to the Web space via the FTP protocol is to configure, as I have already mentioned, the dedicated account: the information you need is theIP address (o host) of the FTP server, the username Password access and, if necessary, the listening port from the server.
Usually, this information can be found in the email sent by your web service provider (eg Aruba): if you have lost the email message, you can contact the dedicated assistance of your manager to request the necessary data .
At this point, click on the icon Site Manager of FileZilla placed top left (alternatively, you can select the menu File> Site Manager o FileZilla> Site Manager) e pigia sul pulsating New Site placed in the new window: assign a name to the site, typing it in the appropriate box located on the left, under the folder My sites; then fill in the right side of the add panel with the required information.
- Host - type the IP address or host name of your site's FTP server.
- Port - type the name of the port on which the server acts.
- Protocol - select the item FTP - File transfer protocol from the drop-down menu. If necessary, you can also take advantage of the SFTP (FTP over SSH) or storj protocols.
- Encryption - choose the voice Use explicit FTP over TLS if available.
- Access type - if you have a username and password combination to access your FTP space, select the items from the drop-down menu Normal (to store both username and password) or Request Password (this way, you will always have to type in your password to log in). If, on the other hand, you intend to access an FTP server that supports anonymous access, such as public download servers, you can choose the item Anonymous in the drop-down menu.
- User e Password - if necessary, fill in these fields with the username and password used to access your FTP server.
If you need additional settings, such as choosing a folder on your computer and a folder on the server to be displayed by default in the program panes, changing the time zone, the character set to use or the transfer mode, you can use the tabs Advanced, Transfer Settings e Character set placed in the upper part of the panel Site manager.
Once you have filled in the required fields, click on the button Connect: if this is the first time you set up a site, a window may appear regarding the behavior in case of saving passwords. By placing the check mark in the most suitable box, you can choose the option Save password to store it without having to type it in future accesses, the option Don't save your password to type it each time in the program window.

Finally, you can avail the option Save passwords protected by master password to store the current password but also set one main password to be typed at each access: this last option will allow you to automatically enter all the passwords that you will save in the future, simply by typing the master password. But be very careful: once set, the master password can no longer be changed.
Once you have chosen the option that best suits your needs, the program starts the procedures to connect to the configured FTP server: check the box Always consider the certificate secure in future sessions e pulsing sul pulsating OK to actually proceed with the connection (you only have to do it the first time you connect to the server).
You can repeat the procedure for all the FTP servers you intend to configure in FileZilla and quickly recall them by clicking on the down arrow next to the button Open the site manager, in turn located in the upper left corner of the program screen.
If, on the other hand, you need to connect "on the fly" to an FTP server, without saving the configuration, you can fill in the fields Host, Username, Password e Port, located in the bar at the top, then press the button Quick connection to start the connection with the chosen server. If you want, you can connect to multiple FTP servers at the same time and view each connection in a separate tab, which can be called up from the appropriate section located immediately below the message box (the first from the top).
How to transfer files with FileZilla

The file transfer operation with FileZilla is extremely simple: I anticipate immediately that everything happens with a simple drag-and-drop of the file in question, however you need to understand the arrangement of the panes of the program window, so be sure to copy or move the files to the correct locations. Don't worry if it may seem complex at first: I'm sure that, once you have read my tips, you will be able to move with absolute simplicity!
Going from top to bottom, the FileZilla window consists of six squares: the message log paneTwo boxes containing the folder tree placed immediately below, followed in turn by two panes for file management and finally from transfers box. Below I will explain the function of each of them.
- Log pane Message - all the messages relating to the "communication" between the FTP server and FileZilla appear here: in other words, in this box it is possible to view the outcome of each request (successful connection, access to a folder, start of a file transfer, end of a file transfer, connection or transfer errors, and so on). It can be deactivated and activated by pressing the button Displays or hides the message log window located in the toolbar at the top: this is precisely the second button starting from the left.
- Panes with the folder tree - placed immediately below the message box, these boxes contain the "hierarchy" of PC disk folders (or local directories, on the left) and that of folders on the FTP server (or remote directory, on the right side). Using them, it is possible to quickly navigate both between the folders of the computer and between those of the FTP server by simply clicking on them: the files inside are displayed in the boxes immediately below (which I will talk about in a very short time). The local and remote panels can be deactivated, respectively, by pressing the third and on fourth button located in the upper toolbar.
- File management panes - these panels show the files contained in the folders selected through the panels immediately above. Again, the left side shows the contents of the computer (local) folder, while the right shows the contents of the FTP server (remote) folder.
- Transfers pane - this section of the FileZilla window shows the status of file and folder transfers. If necessary, it can be deactivated by pressing on fifth button of the toolbar at the top.
Once you understand the function of the program sections, the file transfer from the computer to the FTP server It's that simple: first, select the folders source (that of the computer from which to copy the file) on the left side and destinazione (that of the FTP server on which to copy the file) from the right side of the tree panes, then "grabs" the file to be copied from the left side of the file management pane, and drag it in the right part of the same box to start the transfer.
If you want, you can make multiple selections and transfers (with the help of the buttons Ctrl / cmd e Alt / shift) or move, still dragging them from one side to the other, even entire folders. If you need to search for a file because you don't remember its location, you can use the search panel callable by clicking on the icon in the shape of binoculars (the first from the right) located in the upper toolbar.
Following the same procedure, but reversing the transfer direction (i.e. dragging the files from right to left of the file management panel), you can download files from the FTP server to the computer. The progress of transfers is shown immediately in the lower pane: if you want, you can only view incomplete / in error transfers or completed transfers using the sections Transfers not completed e Transfers completed, placed immediately below the box.
I also want to clarify that, by default, FileZilla allows the simultaneous transfer of two files at a time: in case of multiple file transfer, the remaining ones are queued and started as soon as a previous transfer is completed or fails. The limit of simultaneous transfers can be changed, up to a maximum of 10 and a minimum of 1, through the section Settings of the program (which I will tell you about shortly).

Just to be precise, there are also other ways to transfer files with FileZilla, which I briefly explain below.
- Means Esplora File / Finder - you can move files from your computer to the FTP server and vice versa by dragging them from the File Explorer / Finder windows to the remote panes (those located on the right) of FileZilla, and vice versa.
- Through our context menu - by right clicking on a file or folder, in each of the FileZilla panes, a small context menu is shown that allows you to perform various operations, including uploading / downloading files, adding to the related queues, operations for opening / modifying, renaming and deleting files, creating new folders and, in the case of files on the server, copying direct web addresses and managing permissions.
How to configure FileZilla

Now that I've explained to you how to use FileZilla to connect to the FTP servers you need and transfer files between them and your computer, it's time to take a look at the program settings, so as to configure it in detail and adapt it to your needs.
To access the FileZilla settings manager, click on the menu Edit> Settings ... in Windows, or FileZilla> Settings ... on Mac. Below I'll explain how to use the sections and items that are proposed.
- Connection - from here it is possible to manage everything concerning the connection to the FTP server, such as the timeout (i.e. the time that must pass before declaring an operation as failed), the number of reconnection attempts and the delay between failed connection attempts.
- FTP - this section allows you to manage the settings on the details of data transfer via FTP, including the mode (active / passive) and the relative settings, as well as the settings on the use of a specific proxy.
- SFTP - this section has the function of importing the private keys for FTP connections via SSH, in order to use authentication via public key (thus avoiding the use of the username / password combination).
- Generic Proxy - here you can set a possible proxy to be used when connecting.
- Transfers - this section allows you to manage the main settings related to file transfers, such as the limit of simultaneous transfers, the limit of concurrent download / upload or speed limits (to limit bandwidth usage).
- Types of files - from this section you can decide whether to transfer files with ASCII, binary or automatic encoding. Leave everything intact if you don't know what that means.
- Action for existing files - here you can tell FileZilla how to behave if the file to be transferred already exists in the chosen location. You can decide whether to request an action every time, overwrite the file as long as it meets a specific condition (whether it is newer or has a different size), resume the file transfer if it was left pending, rename the file or simply ignore it .
- Interface - from here you can set the general behavior of the program. You can choose to save passwords or not, set (if necessary) the master password, choose the layout of the tiles, the location of the message log and much more.
- Temi - allows you to choose an icon theme to use in the program.
- Date / time format e File size - from here you can choose how to display the date and time, as well as the units of measurement of the file sizes, within the program
- File lists - from this section you can choose how to manage the file lists and how the program should behave when you double-click on a file or folder.
- Language - from here you can set the program language.
- Edit File / File Type Associations - these sections allow the choice of programs and parameters to be used for opening and editing files from within the program.
- Updates, Connection and Debugging - these sections allow you to manage, respectively, the frequency and mode of updates, the logs relating to messages and the options for debugging, useful for analyzing malfunctions.
Before concluding, I would like to make you a very specific recommendation and one that I advise you to keep in mind: do not act on an approach if you have not understood exactly what it is for, as you could compromise the quality of the transfers and the stability of the program itself.
Finally, if you feel that FileZilla is not for you and would like to consider some other program suitable for the purpose, I invite you to consult my article on the best programs for FTP: you will surely find what you are looking for!
How to use FileZilla


