Where to download VMDK files
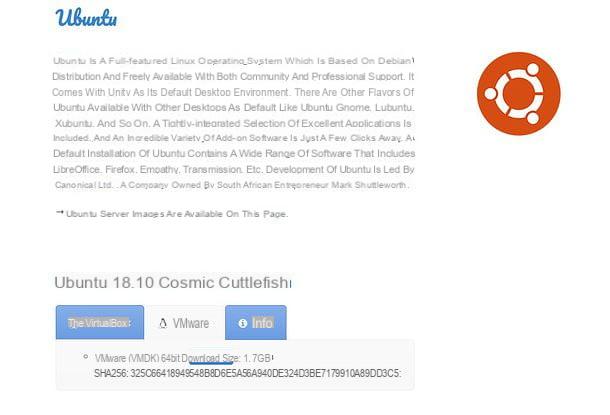
If you go looking for file VMDK to be opened with VMware or other virtualization software, you can refer to OSBoxes: it is an excellent website that allows you to download ready-to-use images of all major Linux distros. Host virtual hard disk files optimized for both Vmware and other virtualization software, such as VirtualBox.
To download an image from OSBoxes, connected to the site using the link I have provided you, select the operating system of your interest (eg. Ubuntu) and click on the item Download VMware (VMDK) image.
On the page that opens, locate the version of the system to download, select the tab VMWare related to the latter and click on the button Download that appears below to start the download of the VMDK file of your interest.
How to open VMDK with VMware
As already mentioned in the opening bars of this post, VMDK files are specific to virtualization software VMware, therefore the first solution I suggest you turn to is this.
VMWare is available in various versions: on Windows you can use it for free for personal (non-commercial) purposes through the named edition VMware Workstation Player, while on macOS it is only available VMware Fusion, which is paid (with prices starting from 71,70 euros) but you can try it for free for 30 days. For all the details, read on.
Windows

It was used Windows, the first step you need to take to open VMDK is to install the program VMware Workstation Player on your computer. VMware Workstation Player is compatible with all latest versions of Windows, as long as they are 64-bit. If you are still using a 32-bit version of Windows, you will need to download an older version of the software (VMware Player 6).
To proceed with the download of VMware Workstation Player on your computer, connected to this web page and first click on the button Download now and then on the button Download refering to VMware Workstation [versione] Player for Windows 64-bit Operating Systems, on the page that opens.
When the download is complete, start the software installation package (eg. VMware-player- [version] .exe), click on your button Yes and wait for the progress bar to reach 100%. Then click on the button Next, put the check mark next to the item I accept the terms in the License Agreement to accept the conditions of use of VMware Workstation Player and complete the setup by clicking on the button first Next four times in a row and then on install e Finish. If you don't want to send software usage statistics to VMware, uncheck the item Join the VMware Customer Experience Improvement Program.

Once the installation is complete, you can import the VMDK virtual machines into VMware Workstation Player, but be careful: the procedure to follow is different depending on whether you also have the file VMX or less. Then start the program, put the check mark next to the item Use VMware Workstation Player for free for non-commercial use (to use the free version of the program), click on the buttons Continue e Finish and proceed as follows.
If you have both the file VMDK than that VMX of the virtual machine, open VMware Workstation Player, click on the button Player collocato in alto a sinistra and selects the voice File> Open from the menu that appears. In the window that opens, choose the file VMX of the virtual machine to import and that's it. The virtual machine will appear in the main VMware Player screen ready to be started with a simple double click on its icon.
If you only have a VMDK file and not the VMX one, you need to create a new virtual machine and replace its hard disk with the image of the virtual machine in your possession. Then, implement the procedure described below.
- Click on the button Player located at the top left and select the items File > New virtual machine give the menu to compare;
- In the window that opens, put the check mark next to the item I will install the operating system later and click sul bottone Next;
- Select the operating system included in the virtual machine you want to import (Microsoft Windows, Linux o Other), select the version or distro from the drop-down menu version and click on Next;

- Name the virtual machine and click first Next twice in a row and then on Finish to complete the creation of the virtual machine;
- Right-click on the name of the virtual machine appeared in the main VMware Workstation Player screen and select the item Settings give the menu to compare;
- In the window that opens, select the icon hard disk e pigia his remove to wipe the virtual machine disk;
- Click on the button Add, select the icon hard disk in the window that opens and presses up Next. So put a check mark next to the entry SCSI and click again Next;

- Put the check mark next to the item Use an existing virtual disk and click on Next;
- Push the button KATEGORIEN and select the VMDK file of the virtual machine to import into VMware Player. If the image consists of several numbered files, choose the first one, the one without numbers at the end of the name;
- Click on Finish and, if asked to convert the disk image, answer no by selecting the option Keep Existing Format.
- Start the virtual machine by double clicking on its name.
MacOS

If you are using a Mac, you need to download VMware Fusion which, as already mentioned, is paid but can be used for free for a period of 30 days. To get the trial of the program, connected to this web page and click on the button Try Fusion [version]> Download now which is at the bottom left.
A download complete, apri il dmg package which contains the application and double-click the executable VMware Fusion contained within it. In the window that opens, answer apri the notice that appears on the screen, then type the admin password of the Mac, come on Submit and wait for the installation procedure to go on.

When the warning about thesystem extension blocked, Reply Open Security preferences and, in the System Preferences window, click on the padlock located at the bottom left. Then type the administration password of the Mac, come on Submit and press pulsating Allow which appears at the bottom right.

When the operation is completed, go back to the VMware Fusion setup window, click on the button Accept, put the check mark next to the option I want to try VMware Fusion [version] for 30 days (in order to use the free trial of the program) and click on the button Continue.
Next, put the check mark next to the item Try VMware Fusion [version], press again Continue, type the administration password of the Mac, come on Submit, choose whether to send usage statistics relating to the use of the software by keeping or removing the tick from the box relating to VMware software usage analysis program e pigia his end to conclude the setup.

A warning should appear that "osascript" requires to check "System Events.app": Reply OK, then press OK also in the accessibility warning window and click the button Open System Preferences. When the System Preferences are opened, click on the icon padlock located at the bottom left, type the administration password of the Mac and come on Submit. Once this is done, locate the icon of VMware Fusion and put the check mark next to it (in order to give the application the accessibility permissions necessary for its proper functioning).

You are now ready to open a VMDK file with VMware Fusion. The procedure you need to follow is not too different from the one I showed you earlier when talking about VMware Workstation Player for Windows.
- Start the creation of a new virtual machine by selecting the item Create a custom virtual machine from the main VMware Fusion window and click on the button Continue (bottom right);
- Select the operating system and version of the latter to be installed in your virtual machine using the appropriate menu that is proposed to you;

- Click on the button Continue three consecutive times (choosing to use boot firmware BIOS Legacy and create a new virtual disk) and then on end;
- Choose the name and location to save the virtual machine and click on the button Save, to confirm;

- Select the virtual machine you just created and go to the menu Virtual Machine> Hard Drive (IDE)> Hard Drive (IDE) Settings, which is located at the top;
- In the window that opens, expand the panel of Advanced options (bottom left) and click on the buttons Remove hard drive e Move to the trash to delete the virtual disk currently used by the VM;

- Click on the button Add device, which is located at the top right;
- Choose to add a Existing hard drive;
- Select the file VMDK of your interest;

- Click on the button Apply and start the virtual machine.
If, in addition to the VMDK file, you also have the VMX, you can import your virtual machine into VMware Fusion by clicking on the appropriate button in the main window of the program or using the appropriate function in the software menu (top).
How to open VMDK with VirtualBox

If you have already installed the optimal on your computer VirtualBox (or, if you intend to install it, follow my dedicated tutorial) and you don't want to download VMware just to open a VMDK file, you can try to import the virtual machine into the program following this procedure, which applies to all the operating systems for which the program is available (Windows, macOS and Linux).
As a first step, open VirtualBox and start creating a new virtual machine by clicking on the button New which is located at the top left. In the window that opens, type the name you want to assign to the virtual machine, select the operating system included in the VMDK file you want to import and click on Continue / Next.
At this point, choose the amount of RAM to dedicate to the machine, press on Continue / Next and apponi il segno di spunta accanto alla voce Use an existing virtual hard disk file. Then click on the icon of folder located on the right, select the VMDK file of the virtual machine to import and click on Crea.

Mission accomplished! Now you just have to double-click on the virtual machine name that appeared in the main VirtualBox screen and wait for it to start.
Don't forget to install the Guest Additions (i.e. the drivers that allow the virtual machine to better interact with the real system). Just select the item Installa Guest Additions from the menu devices and follow the instructions on the screen. If you are emulating a Linux system, the wording changes to Insert the Guest Additions CD image and, to complete the installation, you must open the setup present in the DVD drive of the virtual machine.
How to open VMDK with Parallels Desktop

Parallels Desktop is a virtualization software for macOS characterized by an extremely intuitive user interface and a very complete set of functions, which allows you to perfectly integrate the virtual machine with the host system. It costs 99,99 euros for a single purchase or 79,99 euros / year to subscribe to the subscription that always allows you to have the most up-to-date version of the software, but is available in a free trial version lasting 14 days. If you haven't installed it on your Mac yet, find out how in my post best programs to use Windows on Mac.
To open a VMDK file with Parallels Desktop, launch the software and click the button [+] located at the top right. In the window that opens, click on the button apri (bottom left), select the file VMDK of your interest and assign a name to the virtual machine to be created. Then click on the button Converted and wait for the conversion of the VMDK file to be successful to start your VM.

If the procedure described above is not successful, create a new virtual machine, equip it with the VMDK file of your interest (using it as a virtual machine disk) and that's it.
The steps to take are quite simple: first, create a new VM by clicking on the button [+] located at the top right of the Parallels Desktop main screen. In the window that opens, select the option Install Windows or another OS from a DVD or image fileclick on your button NEXT, put the check mark next to the option Continue without an origin and go again forward.

At this point, select the operating system to be installed in the VM using the appropriate drop-down menu, click on OK, assign a name to the virtual machine and complete the procedure by clicking on Crea.
Now, if the virtual machine starts up automatically, close it completely by selecting the item Stop from the menu Actions (up). Then right click on the name of the virtual machine present in the Parallels Desktop main window and select the item Configure give the menu answer.
Nella finestra che si apre, select the voice Hard disk from the left sidebar and click on the button [-] (bottom left) to delete the VM disk. Next, click on the button [+] and select the item Hard disk give the menu that you come purpose.

At this point, set the item Existing image file in the drop-down menu Typeclick on your button options present in the window that appears on the desktop, set the option VMware disk images (* .vmdk) in the drop-down menu displayed below and choose the file VMDK say your interest.
Fatto ciò, click on your button OK, close the Parallels Desktop preferences window and start the virtual machine to enjoy your ready-to-use VMDK file.
How to open VMDK


