WebSite X5 versions and prices
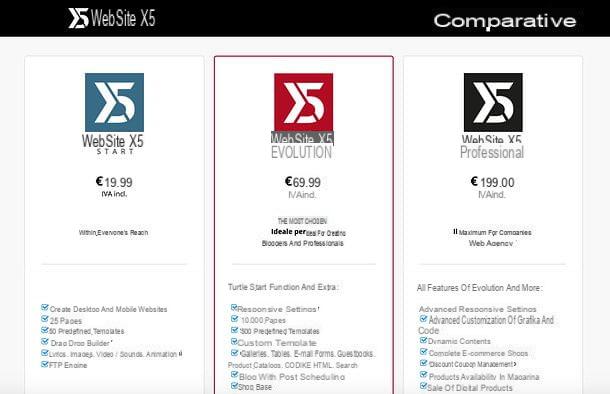
Before getting to the heart of the tutorial and discovering, together, how WebSite X5 works, it seems only right to make an overview of the various software versions available and their prices.
- WebSite X5 Start - is the basic version of WebSite X5. It costs 19,99 euros and offers the following functions: creation of desktop and mobile websites with up to 25 pages; 50 predefined templates; Drag & Drop builder; possibility to insert texts, images, videos, sounds and animations and FTP engine.
- WebSite X5 Evolution - is the intermediate version of WebSite X5, intended for creatives, bloggers and professionals. It costs 69,99 euros and offers all the functions of WebSite X5 Start plus responsive settings; 10.000 pages; 500 predefined templates; the ability to create a custom template; galleries; tables; e-mail form; guestbook; product catalogs; HTML code; search function; blog with post scheduling; shop base; search engine optimization; online control panel; domain, email and free web space for 12 months and Update Protection for 12 months.
- WebSite X5 Professional - is the most advanced version of WebSite X5, intended for companies and Web agencies. It costs 199 euros and offers all the functions of WebSite X5 Evolution plus advanced responsive settings; advanced customization of graphics and code; dynamic content; complete e-commerce store; discount coupon management; availability of products in stock; sale of digital products; automatic user registration; database integration; advanced SEO analysis and functions; FeedReady app for blog feed and news notifications from mobile; WebSite X5 Manager app for managing websites from mobile and 12 months of Update Protection.
It should be noted that all editions of WebSite X5 provide for the creation of an unlimited number of websites and include technical assistance. The price to be paid is one-off: there are no fees to pay, and the license is valid for two PCs.
In addition, a free trial version of WebSite X5 Evolution and WebSite X5 Professional is available to test all the main functions of these software versions. For more information, please refer to the official website of the program.
Minimum requirements

Before downloading and installing WebSite X5, you must also make sure that your computer meets the minimum requirements necessary for the correct functioning of the software: you will find them listed below.
- Operating system: Windows 7 SP1, 8.xo 10.
- RAM: at least 2GB.
- Screen Resolution: at least 1024 x 600 pixels.
- Internet connection and email account (required for activation).
How to download and install WebSite X5

As mentioned above, WebSite X5 is available in one free trial version which allows you to test its features at no cost. Thanks to it, you can create and publish as many sites as you want, save up to 10 pages for each site created and export your project using one of the 25 templates included.
To download the trial version of WebSite X5, click here. When the download is complete open, by double clicking on it, the .exe file just downloaded and, in the window that appears on the screen, first presses the button Yes and then OK e NEXT. Affix, then the check mark next to the item I accept the terms of the license agreementclick on your button Install and wait for the completion bar to reach 100% (the free component will also be installed on the PC Visual C ++ Redistributable, necessary for the correct functioning of the software).

In the new window that opens, click on the button NEXT, type il tuo email address in the appropriate text field and click on the button NEXT. Then log in to your inbox, open the message you received from Web Site X5 and click on the button Confirm your account present in it to activate the trial of WebSite X5.
At this point, go back to the program installation window, press the button NEXT, wait a few seconds for the activation of the copy of WebSite X5 to be verified and press the button starts to start the software.

Do you want to buy the full version of WebSite X5 Evolution directly? Then connected to the official website of the program and click on the button BUY ONE.
On the page that opens, fill out the form that is proposed to you with all the billing data (name and surname, paese ed e-mail), specify if you are a private or a 'company, then provide your credit card details in the form dedicated to payment methods, pigia sul pulsating Continue and complete the transaction. You will then be able to download the full version of the software.

When the download is complete, open the WebSite X5 installation package (eg. wsx5_ev.exe for WebSite X5 Evolution) and, in the window that opens, first click on the button Yes and then OK e NEXT.
Then place the check mark next to the item I accept the terms of the license agreementclick on your button Install and wait a few seconds to proceed with the activation of the software.

Nella finestra che si apre, click on your button NEXT, then type the license key of the software and yours email address and click again on NEXT.
Wait, therefore, a few seconds for the license to be verified, access your e-mail box, open the email you received from WebSite X5 and click on the button Confirm your account contained within it to validate your account.

Now, go back to the WebSite X5 window, make sure there is a check mark next to the item Yes, I want to register now, click again on NEXT and fill out the new form that is proposed to you with name, last name, Password (to be used for account access) e password confirmation.
Once this is done, put the check mark next to the item I accept the conditions on the Terms of Use and finish the setup by pressing the buttons NEXT e starts.
How WebSite X5 works

Now that you have installed Web Site X5 on your computer, you are ready to take action and bring your website to life. As mentioned above, the entire procedure consists of only five steps and requires the use of an extremely intuitive editor: now I'll explain everything in detail.
Step 1: choosing the type of site to create

The first step you need to take to create your site with WebSite X5 is to start the program (via its icon on the desktop or in the Windows Start menu) and click on the button Start, located at the top right.
Then put the check mark next to the item Create a new project, tap on forward arrow located at the top right and, in the window that opens, use the side menu of category to choose the type of site to create (eg. business, online store, food, tech or other).

Once you have chosen the type of site you are interested in, you must select the template to use: many ready-to-use themes are available; some of them, however, can only be unlocked by purchasing specific credits (they are those marked with the cart on their miniature).
To purchase credit packs for WebSite X5, click on the button See all credit packs located at the bottom right, log in to your WebSite X5 account (on the official website of the program), visit the marketplace and click on the button to buy credits. The price of credits starts at € 19,90 for the 25 credit package.

Once you have identified the template you are interested in, select it within WebSite X5 and click on the button OK (if it is a free template) or on the button Buy Now (if it's a paid template) to start building your site. If necessary, enter the login details of your WebSite X5 account in the window that is proposed to you and wait a few seconds for all the components of the theme to be downloaded.
Do you like any of the available themes 100%? Do you prefer to work on a blank site template? No problem: select the option Empty from the WebSite X5 sidebar and choose one of the “white” templates offered by the application.

Now, fill out the form that is proposed to you by entering, in the appropriate fields, all the site settings, then title, author, category, URL address, Description, content language, icon e image representative.

Then move to the board Advanced, where you can set the most advanced parameters of your site. For example, if you are creating a blog, you can click on the button Blog and access a series of tabs through which to create a list of posts, manage the contents of the site's sidebar or more. If, on the other hand, you are creating an online store, you can click on the button Ecommerce cart and manage products and orders on your site.
By clicking on the button SEO and Code Statistics you can adjust the settings related to SEO (therefore optimization for search engines) and SiteMap; by clicking on the button Manage dati you can set up a database to connect to your site (if you need to manage data through this type of tool), while clicking on the button RSS feed you can set your site's RSS feed.

Other useful buttons are those that allow you to manage accesses to the site, customize the entry page, the advertising messages and the rules on privacy and security (for example to display a message relating to the processing of personal data).
Once you have adjusted all the settings, click on the button () located at the top right to save preferences, then on the icon floppy disk (always at the top right) to save the project and, finally, on the forward arrow to move on to the next step, that is to customize the model.
Step 2: model customization

As just mentioned, the second step required by the procedure for creating a website with WebSite X5 is that relating to customization of the model previously chosen. There are various aspects on which it is possible to act, such as the use of a responsive style (which automatically adapts to the resolution of computers, smartphones and tablets), the content of the header and footer (therefore of the top and bottom of the pages of the site) and much more: just click on the button for the aspect to customize and adjust your preferences. Here is all explained in detail.
- Resolutions and Responsive Design - by clicking on this button, you can choose whether to create a "static" site, mainly intended for desktop systems, or whether to create a responsive site capable of automatically adapting to the resolution of computers, smartphones and tablets. In the latter case, you can also customize the breakpoint after which to trigger the resolution change.

- Structure of the model - by clicking on the button in question, you can set the model structure (header and footer; header, footer and sidebar on the left or header, footer and sidebar on the right) and set color, image, arrangement, alignment and size of the various parts of the latter (page background, header background, page content, footer, etc.). You can act on a convenient scheme that allows you to select with a click the part of the model to customize.

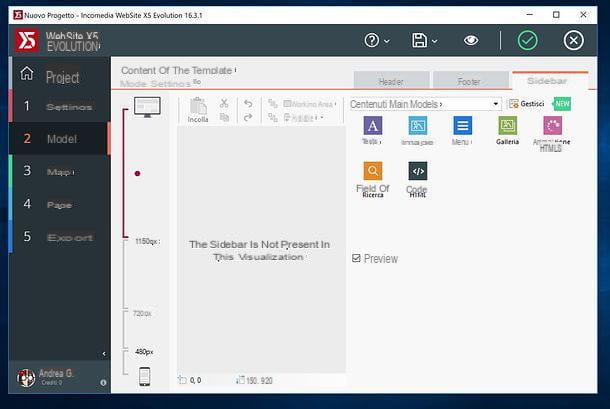
- Contents of the model - by clicking on this button, you can add various contents to the header, footer and sidebar of your site, then having the possibility to customize them freely through the integrated editor (by simply double clicking on them). You can insert texts, images, menus, search fields and much more.
- Styles, Texts, Fields and Buttons - as its name suggests quite easily, this button allows you to set the style of texts, fields and buttons on your site. You can select each element from the diagram on the right or from the appropriate drop-down menu and then adjust its parameters (eg text color, background, font type, etc.) using the fields that appear on the left.

- Hover tooltip - by clicking on this button, you can customize the style (ie background, color of the text, etc.) of the "comics" that appear when the user passes the mouse over an element of the site with the pointer.

- Email composition - thanks to this button, you can set a default template for e-mail messages sent by site users. Using the appropriate drop-down menu, you can adjust the email structure, company logo, message content and footnotes.

- ShowBox pop-up window - if, on your site, you intend to insert ShowBox pop-up windows (those boxes that obscure the page below to show, for example, the enlarged versions of the images selected by users), this is the button you must press to customize them until down to the smallest detail.

- Sticky Bar - another element you may want to include on your site is the sticky bar, i.e. the top bar with navigation menu, logo etc. which remains “glued” to the screen even if the user scrolls the page. With this button you can customize both the appearance and the content of the sticky bar.

- Change of model - if, by customizing the template previously chosen for your site, you have noticed that this is no longer for you, click on this button to change it.

- Personal library - by clicking on this button, you can organize a library with all your custom templates, adding new ones, importing them from external folders, renaming or deleting them.

After adjusting each parameter of the site, click on the button () located at the top right to save your preferences or, alternatively, on the button (X) (always at the top right) to cancel them.
Then click on the icon floppy disk to save the project and on forward arrow to go to the next step. By clicking, instead, on the icon of theeye you can preview your site in real time.
Step 3: creating the sitemap

Now you need to create the site map, then you have to organize the pages that will make up the latter into levels and sub-levels: be careful to appropriately rename levels and pages, as the names you choose will be included in the navigation menu and will be used as the titles of the pages of the site .
The map creation process is extremely simple: just select the pages on which to act and use the buttons located on the right side of the window to perform the desired actions. For example, to rename a page, all you have to do is press the button Rhinomine; to delete it, you have to click on the button Remove, while to move it up or down, you have to use the arrows going up or down.
To create a new level in which to organize the pages, you must instead click on the button of the same name (always in the right sidebar). Same goes if you want to create one new page or would you like to enter a separator.
By selecting a page (or section) and clicking on the button Property (above), you can customize some of its properties, such as the full title, Its Description and keyword for search. Then, by going to the card Graphics you can customize some graphic aspects of the selected page (eg the background or the icon to be displayed in the navigation menu), while going to the tab Expert you can insert custom code before or after the HEAD tag, the BODY tag or before opening the HTML tag.

Once all the changes have been applied, click on the button () located at the top right to save your work and return to the site map creation menu. On the screen in question, by selecting a page and clicking on the button Hidden (above), you can make sure that the latter is set as a hidden page and does not appear in the navigation menu.
By clicking on the button instead Protected, you can set the page as a secure page and reserve access to it only for users who have valid credentials. The buttons Size, Copy e Pasteinstead - almost needless to say -, they allow you to cut or copy a page and paste it into the site map (in order to duplicate it or, if necessary, move it by section).
Once you have created the sitemap, click on the icon floppy disk (top right) to save your work and proceed with customizing the pages by clicking on forward arrow or by double clicking on the title of the page on which to operate.
Step 4: creating the pages of the site

Once the page to be customized has been selected, the WebSite X5 editor will open which, as widely mentioned, is disarmingly simple. On the left, in fact, there is the layout of the page on which to operate, while on the right there is the list of elements that can be inserted inside it: testi, images, tables, gallery, contact forms etc. organized into specific categories.
By expanding the drop-down menu located at the top right and selecting one of the items contained in it (eg. All Objects, Main contents Page, Main contents Model, Animation Data Visualization, Google lcons Image, Slideshow etc.) you can in fact view all the tools available based on their respective categories. By clicking on the button instead Manage (also located at the top right), you can customize the groups of instruments, update those already available and add others. Convenient, right?
Once you have identified the object of your interest (eg a field of text or animage), all you have to do is select it with the mouse and drag it to the section of the page you prefer.
The page is initially divided into a certain number of rows and columns. If you want, however, you can easily customize it using the buttons at the top, which allow you to add or remove cells and columns, setting up display effects for selected items (the star icon), assign anchors to the latter (the anchor icon) and much more.
To "spread" an object inserted on the page on multiple rows or columns, instead, all you have to do is click on it and use the indicators that appear at the edges to “widen” it in the desired direction. Obviously, the target cells and rows must be empty and contain no other elements. To delete an item, instead, right-click on it and select the item Remove from the menu that opens. Easy, right?
Once you have entered the elements you want on your page, to customize them, select them with the mouse and click on the button Content located at the top left (or double-click on them).
A new screen will open with all the editing tools related to the selected object. For example, in the case of texts, you will find yourself in the presence of a Word-style editor with all the text formatting options, buttons to add photos and links and more.
In the case of images, you will find yourself in front of a form to indicate the location from which to upload the photo (local or online) and two tabs: viewing e SiteMap, through which, respectively, set the options for displaying the image (resizing, quality, etc.) and its position within the SiteMap (if you wish to add it to the SiteMap).

For other content, such as i contact forms, gallery no widget of Google Translate e Google Maps, the same mechanism applies: by double clicking on them you can customize them and populate them with the data of your interest (all in a very intuitive way, thanks to the buttons and menus of WebSite X5). Some elements, however, such as the catalogue, recall the contents set in step 2 of the site creation process.
Once you have set the contents of each element, to save your work and return to the page customization scheme, all you have to do is click on the button () located at the top right.

In addition to the contents, WebSite X5 also allows you to change the style of each object added to the pages of your site. To proceed, click on the icon of an object added to your page and press the button Style which is located at the top.
In the screen that opens, use the tabs Style, Texts e library to change the properties of the selected object, such as the background, opacity level, color and font of the text. Then, when you are satisfied with the changes made, click on the button () (located at the top right) to save your work and return to the page edit menu.

Once the page personalization process is complete, click on the icon floppy disk (top right) to save the project and press on forward arrow to go to the next page. Alternatively, select the item 3. Map from the WebSite X5 sidebar and double-click on the name of the page you want to edit, to directly edit the page of your interest.
At the end of the procedure, click on the icon floppy disk (top right) to save your work, then on theeye to preview the site and finally on the forward arrow to move on to the next step - the final one -, which involves publishing or exporting the site locally. Alternatively, you can reach the same section of WebSite X5 by clicking on the item 5. Export located in the left sidebar.
Step 5: publishing the site

When you have completed the creation of all the pages of your site, you just have to face the fifth and last step of WebSite X5: the one related to online publication or local export of the same.
If it is, therefore, your intention to publish the site on the Internet, click on the button Export the site to the Internet and fill out the form that is postponed to you with all the required data: server type, FTP address, username e Password (and, if you like, also destination folder, port and number of simultaneous connections).
Then make sure there is a check mark next to the item Export all website files (later, you can take advantage of the option Export only files modified since the last export occurred on date xx and publish only the files modified since the last site export), click on forward arrow and follow the on-screen instructions to finish publishing the site.

If you do not have a web space at your disposal yet, you can take advantage of one of the promotions offered by WebSite X5 Evolution or WebSite X5 Professional: to find out about the promotions reserved for you, connected to this web page, log in to your account, click on the you don't know (in alto a destra) and selects the voice Web space give the menu check if you press.
Then identify the offer you prefer the most among those proposed by WebSite X5 partners, select it and click on the option to redeem your promo code and use it for the foreseen period (usually 12 months).

If, on the other hand, it is your intention to export the site locally, click on the button Export the site to disk, click on sull'icona della folder to select the path to save the site files and presses on forward arrow to start copying the data.

If you do not want to export the individual files that make up your site, but the WebSite X5 project to be used, perhaps, on another computer, choose the option Export the project from the menu 5. Export of the program, click on the icon of folder to select where to save everything, choose if include a copy of the site preview e/the search backup copies and press on forward arrow to start data transfer. Easier than that?
WebSite X5 support

If you need more information about the operation of WebSite X5, you can contact the official Help Center of the program, which includes a support forum, guides to use the software and a gallery with templates and sites created by users.
To use it, connect to its main page and choose whether to search for a topic in the support forum and guides, using the search bar placed at the top, or if you browse the various contents available by clicking on the buttons Guide, User templates e User sites located at the bottom.
If you want to participate in the WebSite X5 forum by creating a new discussion, click on the button Get support, by your complaint Start a discussion and log in to your account (the one you created when you installed the program). Please indicate, therefore, if you want to formulate one question, A 'idea or appreciation, type il title you want to assign to your discussion in the appropriate field (below) and click on the button Continue.
Once this is done, look if there are already threads similar to the one you would like to open on the forum and, in case of negative result, press the button Continue to post your message. The WebSite X5 community will be ready to answer your questions and resolve your doubts.
Furthermore, I point out that you can have even more detailed instructions on how WebSite X5 works by consulting the official software guide found on this page. Enjoy the reading!
Article created in collaboration with WebSite X5.
WebSite X5: what it is and how it works


