How to use TeamSpeak on PC
If you want to know how to use TeamSpeak on PC, pay close attention to the information I will give you in the next chapters. I will show you how to download and install the TeamSpeak client and how to perform the various operations that can be performed through this communication software, both on Windows and on macOS.
Download and install TeamSpeak
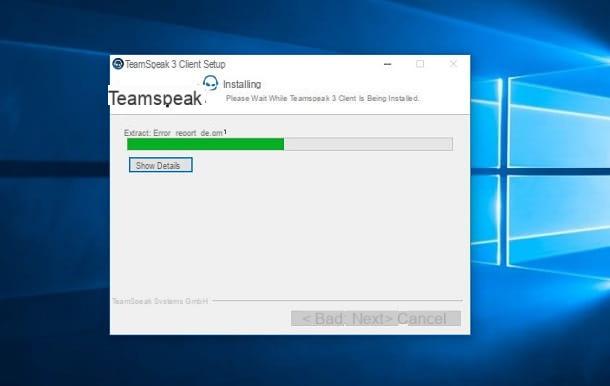
The first step to use TeamSpeak is to download its client, which is free. First, go to the program's official website and select the tab TS3 Client. Once this is done, press the button Download, which you find next to the wording relating to the operating system in use on your computer.
After the download is complete, in case you use Windows, double click on the file .exe obtained and then press Yes, in the User Account Control window. By doing so, you will be shown the TeamSpeak installation screen. Then press the button Next and check the box I accept the terms of the License Agreement. Next, hit the button Next four consecutive times, then on install and finally, su Finish.
If you own a Mac, to install TeamSpeak, you need to double-click the file instead .dmg you downloaded and, in the screen you see, press the button Agree. At this point, drag theTeamSpeak icon inside the folder Applications, in order to install the software.
Connect to a TeamSpeak server

Now that you have installed TeamSpeak, the next step is to start it, to connect to a server. To do this, use the quick launch icon of the software that you find on the Windows desktop or in the macOS Launchpad and, on the screen you see, scroll through the program's terms of use. Then press the button I accept and then press on Continue e Continue without logging in.
TeamSpeak allows you to create an account to synchronize your data in the cloud, in order to retrieve them after installing the software on other devices, but it is not a mandatory procedure. Now, point to one of yours nickname of your imagination, in the appropriate box that is shown on the screen, and press on OK.
To connect to a server, you have two options: connect immediately via voice Connections, in the menu bar at the top, or create a bookmark to store your server access data, so you can quickly reconnect as many times as you want.
In the first case, select the items Connections > Connect and, in the on-screen box, type the server address in the box Server nickname or address. If the server requires a password, type it in the box Password server and press the button Connect to log into the TeamSpeak private server.

Alternatively, you need to bookmark the data from the server you want to connect to, so you don't have to type it in from time to time. To do so, click on the items Bookmarks > Manage bookmarks in the menu bar at the top and, in the screen that is shown to you, press the button Add bookmark.
Then type in a label to attribute to the server (Bookmark name) and enter his address in the text field Server nickname or address. Again, if necessary, type the server password in the field Password server. After that, to quickly access the saved server, click on the entry Bookmarks in the top menu and choose its name from the list that appears.
Configure the microphone

By default, TeamSpeak uses computer settings to identify audio input and output sources. In case you want to use a microphone other than the one set as default on your PC or want to change its settings, perhaps because other users of the server don't hear you well, I suggest you read the following paragraphs carefully.
First, click on the items Tools > Options in the program menu and, in the screen that is shown to you, select the tab Capture, from the sidebar. Now, using the drop-down menu located next to the wording Capture device, select the voice Default, to use the microphone set as default on your computer, or choose one from the list.
Once this is done, you have to select the method to speak on TeamSpeak: you can choose whether to speak in Push-to-Talk, i.e. with the microphone that is activated only when you press a specific key chosen by you, or if you keep the microphone always on (Continuous Transmission), but it is not recommended because it can disturb other users on the server. The recommended option is Voice Activation Detection, which instead allows you to set a sensitivity to the microphone such as to capture the sound of the voice only within a predetermined value.
In the latter case, you can use the bar at the bottom to adjust the tolerance level: negative values increase the sensitivity of the microphone, while positive values decrease it. You can check the settings by pressing the button Begin test and starting to talk.
Interacting on channels and users

A TeamSpeak server usually consists of several channels, in order to allow users to be able to converse on specific topics. When you join a private TeamSpeak server, if you have been given permission to move between channels, you simply need to double-click on a channel to join. Alternatively, just right-click on the channel and select the item from the context menu Switch to channel.
After you join a channel, you can start chatting with other users through your microphone, or you can send text messages using the chat below, by selecting the tab that shows the same name as the channel.
On the users of a channel it is then possible to perform interactions, which allow you to manage some specific functions, present in the context menu that appears by clicking with the right button on their nickname. For example, if a user forgets the open microphone while not at the computer and therefore annoying noises are heard, selecting the voice Mute client it can be "silenced". If, on the other hand, a user has the volume too low or too loud, it is possible to adjust it manually through the voice Change volume.
In addition, you can also send text messages to a specific user, using the private chat (Open text chat) or send a short message to get his attention (Poke client).
Manage a server

A TeamSpeak server can be managed in every aspect, in order to allow the creation of different sections with specific permission groups, also used for simple moderation.
If you have purchased a server (an operation I told you about in this guide of mine), to manage it, click on the item Permissions and use the different items to access the configuration panels of the specific permissions. For example, if you want to create a new group of permissions to assign to a user or you want to modify the existing ones, select the item Server Groups and verifies every single item to configure in detail what a user can and cannot do.
If you want to create a channel, however, you can act through the voice Create channel which you find in the context menu accessible by right clicking in the channel list. Then selecting the items Permissions > Channel Groups, you can create roles that can be assigned to users only to manage channels and not the entire server.
Also, by right-clicking on any user, you can use the context menu items to perform moderation operations, such as kicking out of the server (Kick client from server o Ban client).
How to use TeamSpeak on smartphones and tablets
TeamSpeak it is available, for a fee, also as an app for mobile devices: it costs 1,69 euros on Android and 5,49 euros on iOS. In the next chapters, I will explain how to use it and configure it best.
Download and install TeamSpeak

If you want to install TeamSpeak on your smartphone or tablet, you must purchase the app for Android or iOS from the digital store of the operating system in use on the latter.
Su Android, you must then reach this link to open the Play Store and then press on green button with price. By doing so, you will be shown the purchase options available on your Google account (I told you about it in my guide). Then follow the on-screen procedure to confirm your purchase and begin downloading and installing the app.
Su iOSinstead, to install the TeamSpeak app, you need to reach this link and click on blue button with price. At this point, use the Face ID, Touch ID or password of your iCloud account to confirm the purchase through the payment system associated with your Apple account (I told you about it in this guide of mine) and wait for it to be downloaded and TeamSpeak app installed.
Connect to a TeamSpeak server

After downloading and launching the TeamSpeak, to connect to a server, press thebookmark icon with "+" sign and type the requested information in the screen that is shown to you. Then enter a label to recognize the server as a bookmark, using the box Label, and then type the server address (Server nickname or address).
If necessary, also indicate the password for accessing the server, indicating it in the box Password server, then scroll the screen and press the button Save. By doing so, a new bookmark will be created to quickly connect to your TeamSpeak servers.
At this point, you simply have to tap on the name of the newly created bookmark, to immediately connect to the server.
Configure the audio

To set up audio in the TeamSpeak, you have to act in the settings of the same. To do this, tap onicon with l'ingranaggio located at the top and uses the parameters present in the section Audio to adjust the type of input you want to use.
You can, for example, choose to use the Push-To-Talk, as it happens with the desktop client: in this case, put the check mark next to the box Use Push-to-Talk and configure a physical key on the device by voice Set a Push-to-Talk Key.
You can also decide to speak in a normal way, like in a telephone conversation, by setting the microphone to be activated by voice Voice activation level. The choice is yours.
Interacting on channels and users

After you have logged into the TeamSpeak server, in case you have been given permission by the administrator to move freely between the audio channels, all you have to do is keep your finger pressed on the name of a channel and select, in the box on the screen, the voice Join channel.
After logging in to the channel, you can start chatting with other users via the previously configured audio settings. If you want, you can also send text messages to the channel, using theicon with speech bubble that you find at the bottom left.
If you want to interact with a user, however, you have to keep the pressure of your finger on his nickname and use the options that are shown to you on the screen. For example, use voices Open chat to write a private message to a user or Poke to send a short message to get his attention.
Manage a server

Through the app of TeamSpeak, if you are the administrator of a server, you can manage it in a very simple way. For example, keeping finger pressure on the nickname of a user, in the box you see below, you can decide whether to kick him out permanently (Ban), whether to expel it (Kick from server o Kick from channel) or whether to assign a set of permissions (Set Groups).
By pressing, instead, your finger on the name of a channel, you can change it (Edit channel) or add new sub channels (Create sub-channel). Generally speaking, if you want to manage your TeamSpeak server in every aspect, I recommend that you use the desktop version, using the app only to get in touch on the move with other users of your server and exercise moderation powers.
How to use TeamSpeak


