Preliminary operation
Before taking a closer look how to use a Reflex, it is good that you indicate what preliminary operations you must perform to use the model of camera in your possession.
Insert the battery and SD card
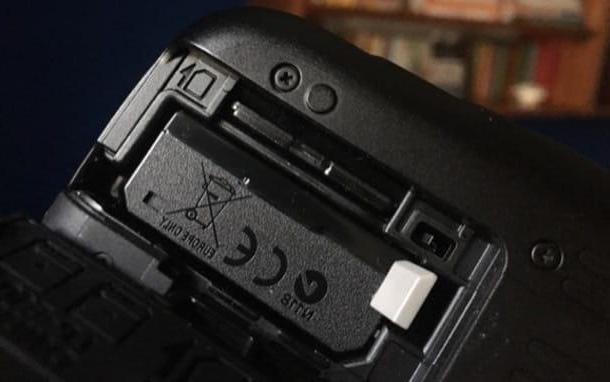
The first thing you need to do to use your Reflex is insert the battery and SD card in the appropriate slot, otherwise, very trivially, you will not be able to turn on the camera and save the photos on a memory medium.
In the camera I used for the tutorial (Canon EOS 1300D), the cover that protects the battery and SD card compartment is located at the base of the camera body and is marked with the writing CARD / BATT. - OPEN ▾, but on other machines it could be placed sideways or elsewhere. After lifting and opening the door, you must then gently insert the battery (making sure it is charged) until you hear a sort of click and then do the same thing with the SD card as well.
When you need to remove the battery or the SD, you will have to reopen the door in question and press on removal tab battery or SD card (or, in other models of machines, press directly on one of these).
Snap on the target

Attach the lens to the camera body it is another fundamental operation to be able to use a reflex camera. Without a lens, in fact, the sensor placed on the camera body is “blind” and cannot capture the image.
To attach the lens to your camera, you must first remove the protective cap from the lens union and also remove the sensor protection cap from the camera body. After that you need to align the mounting indicators which are present both on the lens bayonet and on the Reflex connector e rotate the lens until it locks into place (you should hear a click).
To detach the lens installed on the Reflex, then, you will have to press the appropriate one release button placed on the camera body (near the lens inlet) and rotate in the opposite direction with respect to the coupling. I recommend: when changing lenses, try not to waste time because if the sensor or the lens remain "uncovered" for too long, they can capture dust and get dirty, not offering a good result in the shooting phase. Understood?
Turn on the Reflex

After attaching the lens to the camera body, you can finally turn on the Reflex and start using it to take your first photos. To turn on the camera in your possession, all you have to do is locate the special power button located on the camera body. In my case, it is a lever that simply has to be moved up ON.
The first time you turn on the Reflex, you have to set the language date,Now and other parameters required by the camera: to do this, all you have to do is follow the instructions you see on the screen and move between the various menus using the selection buttons placed on the machine body. If you have any difficulties in this regard, I invite you to consult the user manual of your Reflex.
Taking pictures with the SLR
Now that you have your camera ready, you can finally use it for take pictures. Let me show you how to do this by choosing the shooting mode that best suits your needs and following some simple principles of composition. Find everything explained below.
Choose the shooting mode

If you have bought a DSLR, obviously you want to try to enter the world of creative photography manually setting the various shooting parameters, such as shutter speed, aperture, ISO sensitivity, and so on, not letting the camera do it for you. Before explaining (in the next chapter) how to do this, let's take a closer look at what the main ones are shooting mode available on Reflex cameras, so you can choose the one you think best suits your needs.
- Automatica - this mode, usually marked on the camera body by the letter A or from the writing CAR, makes it impossible to change the shooting parameters. The camera, in practice, manages the shutter speed, shutter speed, aperture and so on completely automatically.
- AE program - using this method, marked by the letter P on the ring on the camera body, it is possible to “delegate” to the camera the choice concerning the shutter speed and the aperture. The other settings can be adjusted independently.
- Aperture priority - this mode, usually marked by the letter Av, allows you to manage the aperture, leaving the camera to choose the shutter speed. It is recommended that you set this mode when you simply want to manage the level of blur / sharpness of the background and foreground subjects.
- Shutter Priority - usually marked by the letter Tv o S, this mode allows you to adjust the shutter speed, allowing you to choose whether to take sharp shots or "artistic" blur. The camera, on the other hand, automatically manages all the other parameters, including the aperture.
- Manual exposure - this mode allows you to manage all shooting parameters. Although it is the most "complex" to use, as you need to know "where to put your hands" when shooting, it is perfect for taking truly creative photos. Usually, on the camera body it is marked with the letter M.
- Video - the majority of DSLRs also allow you to record videos of good quality. This mode is usually marked with an icon video camera.
To select one of the shooting modes available on your Reflex model, all you have to do is rotate the selection dial placed on the machine body, making sure that the letter corresponding to the mode you want to use (eg. Av, Tv, M, etc.) appears alongside the symbol of dash And that's it.
Adjust shooting settings

Once you've chosen the shooting mode you prefer to use, you can finally adjust some shooting settings, based on the mode you have chosen to use and based on the final result you want to achieve.
As I told you earlier, if you have chosen to activate the automatic shooting mode you will not be able to adjust any shooting settings, while by setting the manual one you can adjust all of them. Make sure, therefore, that you have chosen a mode that allows you to "play" with the parameters you want to change: below you will find the main parameters that you must take into account when you are about to take a picture.
- Shutter time (also called exposition time o shutter speed) - this parameter affects the time the shutter stays open to allow light to reach the image sensor. As you can well understand, the higher the shutter speed (eg. 1/60, 1/10, 1 ", etc.), the greater the amount of light that will reach the sensor and, consequently, the greater the brightness of the photo. Conversely, if you set a very short shutter speed (eg. 1/320, 1/800, 1/2000, etc.), the shutter will remain open for less time and, consequently, the sensor will be reached by a smaller amount of light. The choice of shutter speed also affects the presence of blur (and micro-blur) that will be evident on the shot: by setting a long shutter speed, not only the subject will be captured, but also part of its movement, while setting a time of very short shot the subject will be "frozen" and blur will be practically absent.
- Opening the diaphragm - the diaphragm is a system of blades positioned in an inverse fan pattern that open and close, according to the photographer's choice. The aperture of the diaphragm, which is measured in f / stop, has a direct influence on the depth of field, that is, the range of distances from the camera within which the subjects portrayed will be more or less sharp. By setting a very large aperture (eg. f / 1.4, f / 1.8, f / 2, etc.), the depth of field is decreased and, consequently, the foreground subject will be in focus, while everything in the background will be blurred (as I explained to you in another guide). Conversely, if you set a very low aperture (ex. f / 4, f / 8, f / 16, etc.), the depth of field is increased, obtaining shots that have everything in perfect focus, both the subject in the foreground and the background.
- ISO - this value indicates the sensitivity of the sensor to light. The higher the ISO value, the greater the "effort" that the sensor will make to capture as much light as possible, even in conditions where this is not present in abundance, allowing to obtain more or less bright shots. However, we must be careful not to exaggerate the ISO value (it is advisable never to reach the maximum value present on the camera), especially if you have an entry-level Reflex model. Setting very high values, in fact, also increases the "noise" of the image, or that annoying glossy effect that distinguishes the shots of novice photographers.
In light of the above, how do you have to adjust the shooting settings? You have to be good at balance the parameters correctly of which I told you above, based on the type of situation you are in and, above all, based on the final result you want to achieve. I'll give you a practical example, so you can better understand the point.
Let's say you need to take a photo of a subject in low light conditions. For best results, it would be better slightly increase the shutter speed (so more light will enter the sensor) e increase the aperture of the diaphragm: by doing so, you can use a relatively low ISO value, avoiding making a "noisy" photo. If, on the other hand, you used a shorter shutter speed and a smaller aperture, you would be forced to significantly increase the ISO (otherwise the image would be underexposed): even if the shot could be correctly exposed, the quality would be much more low.
To adjust the parameters in question, after selecting the shooting mode you prefer, you have to press the buttons on the camera body and change the values that are shown on the Reflex display. On the camera in my possession, for example, to change the aperture you have to press the button Av / + -, so as to highlight the box Fx.x, then place your index finger on the main bezel (to be clear, the toothed "wheel" that on my camera is near the shutter button) and move it left or right. A similar operation must also be done with regard to the choice of shutter speed.
As for the ISO, however, in my case you have to press the button ISO and, through the main bezel, select the value you want to use (ex. 100, 200, 400, etc.) and then press the button SET to confirm the operation. If you are having trouble finding the buttons and settings to adjust the shooting parameters on your camera, please refer to the user manual of the device, so as not to have any problems.
Compose the picture and shoot

Once you have adjusted the shooting parameters to use, you just have to compose the picture and take the picture. Therefore, approach theviewfinder eyepiece, close the eye that has been "discovered" and try to compose the image. In this regard, you may find it useful to use the rule of thirds (which in short consists in arranging the subjects you want to highlight at the intersection points of an imaginary grid composed of two vertical lines and two horizontal lines).
Once you've composed the photo, half-press the shutter button, so as to focus on the foreground subject (in my case, a red dot which helps me to "aim" precisely at the subject to focus) and, as soon as you are ready, keep pressing the shutter button.
Et-voila! Your photo has been taken. Now all you have to do is press the appropriate button on the camera body (in my case the symbol ▶ ︎) to preview the shot you took.
Transfer of photos from Reflex to other devices

Once you have taken some photos, you will probably want to transfer them to other devices, so that you can share them with your friends and view them on larger and more defined screens than your camera, so that you can appreciate all their beauty.
transfer photos from camera to PC, you can simply extract the SD card inserted in the machine and insert it into the SD card reader of the computer (or into an external card reader, if the PC does not have one). Alternatively, you can download proprietary software from your camera manufacturer's website that allows you to manage and download the photos you have taken. Then you have to connect the machine to the computer using the appropriate cable USB and follow the on-screen instructions to transfer the files you want to view on your PC.
I also remind you that many of the latest generation SLRs allow you to transfer photos to computers, smartphones and tablets via the Wi-Fi function. On these cameras, in fact, there is a module that creates a local network that can be accessed to download photos and even control the camera remotely. For more information on how to transfer photos from DSLR to other devices, I suggest you read this guide: even if it refers specifically to Canon machines, it can be useful to better understand how the solutions I have just mentioned work.
How to use a Reflex


