From ForDataRecovery, we want to explain how to recover Google Drive backups. To recover files from this famous search engine, you must have the email address to log in. You will not need to download Apps and we will show you how to do it from several devices, for example from Android.
Some time ago you asked a friend to backup some important data through your Google Drive account. Now that you need it again, you would like to stop bothering this person and act yourself: the problem, however, is that you have no idea how to recover backups from Google Drive, because you have never done something like this before. That's right, isn't it, then know that you're in the right place!
In the course of this guide, in fact, I will take care to explain to you in detail how to download documents stored on Google Drive from a PC, smartphone or tablet, even in the form of a single large file. For completeness, I will also explain how to restore backups of Android settings and those of WhatsApp chats.
So, without waiting any longer, get comfortable and read carefully everything I have to explain on the subject: I am sure that, at the end of reading this guide, you will have acquired the necessary skills to succeed in the company and You'll be happy to communicate to your computer friend that he did it himself. happy reading and good job!
How to recover Google Drive backup - data
Basically, it is possible to recover Google Drive data backups in at least two ways: by manually downloading the files you need or by requesting the creation of a single file containing all of them. In both cases, you will need to know the password of your Google account: if you do not remember it, you can try following the instructions I gave you in my tutorial on the subject.
From PC
The easiest way to download the data stored in Google Drive from your computer is to use the official program Google Backup and Sync, through which it is possible to integrate Google Drive files directly into Windows File Explorer or MacOS Finder.
To download it, connected to its official website, click on the resident download item in the Backup and Sync box and then press the Accept and Download button. When the download is complete, open the file obtained and, if you use Windows, click the Yes button to start the automatic installation of the client. Then finish everything by pressing the End button.
If all went well, the Google Drive icon (shaped like a cloud) should appear near the Windows clock: if you do not see it, first click on up arrow (to display the icons "hidden" in the notification area), then click on them and presses the Start button located in the panel that appears.
If, instead, yours is a Mac, use the screen that is offered immediately after opening the file and drag the Google Backup and Sync icon in the macOS applications folder. Now, start the program using the icon you just copied (or directly from the macOS Lauchpad ) and, if prompted, press the Open button to authorize its execution.
From now on, the procedures for Windows and macOS are identical: to start, log in to the Google account from which you want to download the data, using the proposed fields, and click the OK button to go to the program configuration phase.
Then, if you intend to automatically synchronize the folders on your computer, place the check mark next to those of interest to you and click the forward andOK buttons. Note, however, that this synchronization is not necessary for the purposes of this guide: therefore, if you are not interested in loading the contents of the folders on your computer into Drive, uncheck all the boxes visible on the screen (when possible) and press the forward andOK buttons.
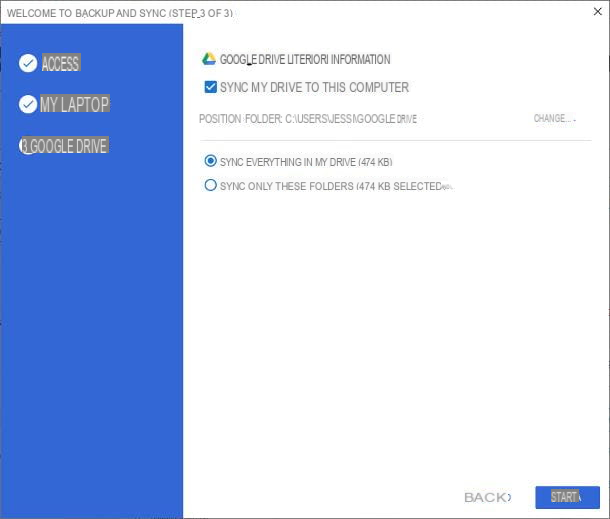
At this point, put the check mark in the item Synchronize my Drive with this computer and specify whether to synchronize everything, thus downloading all the contents of the cloud space on the computer, or whether to synchronize only some folders (which must subsequently be selected by hand).

Once you have made your choices, click the Start button to complete the configuration and start the program, which will download the files to your computer: depending on the size of the files and the speed of the Internet connection, everything could take up to a few hours.
At any time, you can view the synchronization status by clicking on thecloudicon located near the system clock.
Once the synchronization is complete, you can access the folder containing the Google Drive files by opening the WindowsFile Explorer or the Finder macOS and clicking on the Google Drive icon visible in the left sidebar, under the Quick Access or bookmarks section. Alternatively, you can get the same result by clicking on the Google Drivecloudicon first, located near the clock, and then on the resident walletsymbol in the panel that appears.
All files in the Google Drive folder can be opened, edited, copied elsewhere or shared with other programs; it is important to note that any changes made to the Google Drive folder (delete / move, modify, add a file, etc.) will also be automatically reflected in the cloud.

If, on the other hand, you do not intend to download all Drive folders to your computer, but are interested in backing up some files only, you can use Web version of the service, accessible on this website.
Once the page in question is open, log in to your Google account, press the item My Drive visible on the left and choose the file / folder you are interested in downloading; to make a multiple selection, hold down the Ctrl or cmd key on the keyboard and click on each of the files to download.
When the work is done, do it right-click on one of the selected items, choose the item download from the proposed context menu and wait for the file download is complete; if you have selected multiple files or entire folders, it will create a .zip package containing all the items.
From smartphones and tablets

If instead you are interested in recovering Google Drive backup on iPhone,iPad or on Android, you can use the official app of the service, installed as standard on most Android animated devices (you can still download it from Play Store) and also available for iPhone and iPad.
If you have not yet downloaded the app, open the reference store on your device, search for the name of the app using the corresponding search field and, when you have found it, press the Install / Get button, to download it on your device. If necessary, authenticate yourself via facial recognition, fingerprint or password account, to conclude.
After installing the application, open it and, if you are using an Android device or an iPhone on which you have already configured other Google applications, tap the name of the configured account, to log in; alternatively, enteryour credentials in the appropriate fields and tap the Start button.
Once the login is complete, if necessary, authorize the application to access the memory, answering affirmatively to the prompt that appears, tap on the File card (thefoldericon located below) and identify the item of interest to you, among those stored in the cloud.
When you have found it, tap the button (⋮) corresponding to it and tap the Available offline item from the proposed menu, in order to access the file through the Drive application, even in the absence of Internet connection.
If you want to save a copy of the file elsewhere in memory or share it within an application, select the entry instead Send a copy from the menu I told you about earlier and tap the Save to option or your file manager icon (for example, Google files) from the panel displayed on the screen, to save the file in memory, or the application icon through which to share the item. If prompted, choose where to save the file, tap the Save / OK button of the file manager and that's it.
Note: if you wish, you can make a multiple selection by long clicking on the icon of the first item to share and then clicking on the icons of all the others. The share button, in this case, appears in the upper right corner of the Drive screen.
Via Google Takeout

Finally, if you need to download the backup of all items in Google Drive at once (convenient option if, for example, you are thinking of closing your account to open a new one), you can take advantage of the service. Google: this is an official function made available by Google, through which it is possible to create, in a short time, anarchive containing all the data associated with a specific account (including, of course, those of Drive).
To use it, connect to this website from the browser you usually use to surf the Internet (the service is accessible from PC, smartphone and tablet) and log in to your account, entering the credentials in the appropriate fields. If necessary, complete thetwo-factor authentication by following the instructions given to you.
Once the login is complete, select the data to be included by placing the check mark next to the relative names: in this specific case, to download the backup of the items stored in Drive (that is, those owned by you, present in the My Drive andComputer sections), of the images and videos from Google Photos, place the check mark only next to the items OK andGoogle Photos.
Made your choices, press the Next step button visible at the bottom of the page and using the menus and options proposed below, to define the mode and type of export of the backup: set the drop-down menu Delivery method,Email the download link, to receive an email with the link to download the backup and use the drop-down menu Frequency1 export, to create the file only once.
As a next step, specify the Format in which to create the backup (file.zip or.tgz) and the maximum weight of each file composing it(1 GB, 2 GB, 4 GB, 10 GB or 50 GB) using the menus respectively File type andDimensions and finally press the Create export button, to start creating the file containing the copy of the data from Google Drive.
Depending on the size of the items to be saved, the procedure, which proceeds fully automatically, could also take days. Once the creation is completed, you will receive an email message containing the download link, which will be used to download the file, with a duration of one week. You can check, at any time, the progress of the backups made and the download links that are still working, by accessing this website.
For more information on how Google Takeout works, I recommend you read the in-depth analysis I have dedicated to the service.
How to restore backups from Google Drive: Android

Have you taken care of syncing data from your old Android smartphone or tablet (call history, alarms, ringtones, wallpapers, SMS, system app data, installed apps, etc.) to the cloud, using the appropriate system feature?Restore Google Drive backups to your new device? Don't worry, it's all much simpler than it sounds.
To succeed in the company, in fact, it is enough to choose to transfer applications and data from an existing backup during the first setup of the device (after choosing the language and connect to Wi-Fi network) and, when prompted, sign in to thesame Google account in use on the old one. Once the sign-in is complete, respond affirmatively to the request to download apps and settings from Google.
If this is your first time switching devices and you have no idea how to set up your smartphone for the first use, the tutorial I dedicated to the topic could be very useful.
As things currently stand, it is not possible to directly download the Android backup data, but you can still view the size of the same, directly from the Google Drive for PC site: after connecting to the latter and log in to your Google account, click on the items archived (left) andbackup (right) and finally double-click on the name of the device for which you have saved the data.
How to restore WhatsApp backup from Google Drive

You have switched to a new Android smartphone and you want to restore WhatsApp backups that you had made, with Google Drive, on the previous one? No problem: to do this, just set up the new device with the same Google account, install WhatsApp and proceed with its initial configuration.
For everything to go well, if WhatsApp is still active on the old smartphone, I advise you to update the backup of the conversations: therefore, open the messaging app, tap the button (⋮) resident at the top right and select the item settings from the menu that appears.
Now, go to the sections Chat andChat Backup and choose whether or not to incorporate the videos in the backup, acting on the lever Include videos; made his choice, tap the Support button and wait for the data to be saved.
Once done, uninstall WhatsApp from the previous device and install it on the new one; now, start the newly installed application, acceptthe terms of use of the service, specify yourphone number (which must be the same as the one associated with the previous backup) and verify it, via SMS or phone call.
If everything went well, you will be prompted to restore previous backups from Google Drive: when this happens, tap the Restore andEnd buttons (the first step may take a few minutes) and, if necessary, re-enter yourname and yourprofile picture.


