From ForDataRecovery, we want to give you Information on How to Recover an Unsaved Excel File. To perform a Microsoft Office Microsoft Excel Program File and Data Recovery, whether you have a Backup or not, here is how you can do it.
It took you hours to create the Excel workbook your boss asked you to create, and just before you were able to perform the final rescue, your computer decided to abnormally shut down, leaving you impaled (and terrified!) in front of the screen. After a few seconds of disorientation, you decided to take matters into your own hands and search Google for a solution that could contain the damage caused by the unexpected.
Well, you found it! Below, in fact, I'm going to explain how to recover an unsaved Excel file on both Windows and Mac computers. Specifically, I will show you how to achieve this using the Microsoft Office program, the LibreOffice Calc software and finally, directing you to other software specifically dedicated to data recovery.
So, without further hesitation, make yourself comfortable and read carefully everything I have to explain on the subject: you'll see, the result will satisfy you. That said, I have no choice but to wish you a good read and good luck with everything.
How to recover an unsaved Excel file in Windows
If you need to recover an unsaved Excel file and you have a Windows PC, this is the chapter of the tutorial that suits you best. Below, in fact, I will explain all the steps to follow to recover an Excel workbook, a LibreOffice Writer worksheet and, finally, to attempt a recovery through some specific third-party software that acts from Microsoft's home operating system.
Microsoft Excel
Recover Previous Excel Version
If you use the version of Microsoft Excel included in your Office 365 subscription and you have synchronized your data with your Microsoft account, do not worry about losing your files: the program can create automatic backups on OneDrive. For this reason, if Excel should close abnormally, just reopen the document you are interested in as usual and access the last available temporary save (you will see a special box when you open the program).
If, on the other hand, you do not use Office 365 or if you have not activated data synchronization in the cloud, the matter is slightly different: Excel itself will propose, at the first startup after the unexpected closure, to restore the files that you have not been able to save manually, retrieving them from a local file created automatically.
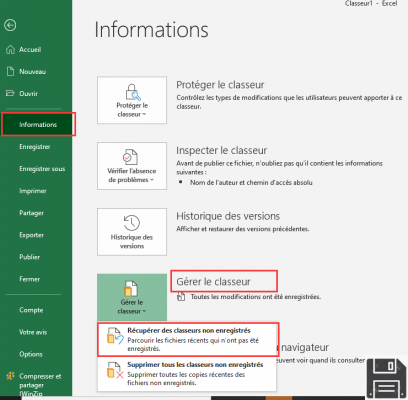
Basically, what you have to do is open the program and take a look at its left pane: locate the Show recovered files item, identified by a folder icon, and click on it to access the recovery phase. Alternatively, you can directly open the unsaved worksheet to find yourself directly in the file recovery screen.
At this point, simply hover your mouse over the version of the working folder you wish to recover (helping you, if necessary, with the date of the last save), click on the down arrow next to it and choose between Show document in current window, Save as a copy of the file or Close restored document, thus eliminating the automatic save.
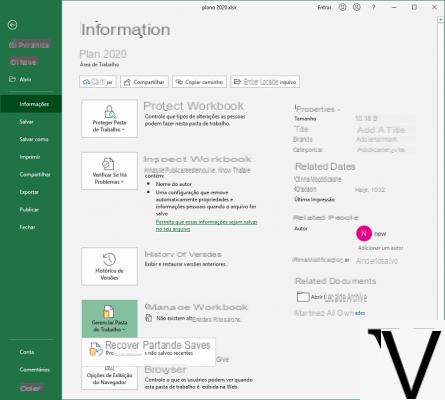
To limit the chances of data loss during recovery, you can decrease the time interval between automatic Excel backups, which, by default, corresponds to 10 minutes: to do so, go to the File tab and click first on the Options item and then on the Save item located on the left side of the screen.
Finally, check the Auto-save each information, specify the time interval (in minutes) in the immediately adjacent text field and also check the option Save the last restored version automatically if you close without saving. Finally, press the OK button to confirm the changes.
If this option is not present, it is very likely that Excel has not been able to generate a provisional draft of the workbook: in that case, you can try to recover the auto-saved files using the manual procedure. To do this, first, locate the Excel Temporary Files storage folder by clicking on the File menu at the top left, going to the Options tab and then to the Save tab, which is attached to the window that appears later.
Next, copy the folder path specified in the Auto Save File Path box (for example, C:UsersnameAppDataRoamingMicrosoftExcel) and close Excel. After this step, open aFile Explorer window (the yellow folder icon located on the Windows taskbar), click on the address bar at the top, delete its contents, paste the previously copied path and press the Enter key on your keyboard.
The game is practically over: with a bit of luck, you should see some autosaved files with a name similar to DocumentName_[Autosaved] and extension . xlk/. tmp, orbackup files , named Backup Of [DocumentName] with the extension .asd. Once you have identified the file you are interested in, right-click on the file icon, choose Open With from the context menu and select the Microsoft Excel file.
If you cannot find files with the .xlk, .asd or .tmp extension, you can perform an exhaustive search using the Windows Start menu or a program like FileSeek: I have explained everything in the guide to finding files on your computer.
LibreOffice Calc
If you manage Excel files using LibreOffice, then I have good news for you: by default, Calc, the spreadsheet management program included in the well-known open source office suite, automatically saves processed documents every 10 minutes. For this reason, it is very likely that you will be able to recover an unsaved Excel spreadsheet using one of these automatic saves.
In practice, all you have to do is re-open Calc as usual and wait for the window warning you of the presence of unsaved documents left open before the software crashes: to recover them, just click the Start and End buttons.
If there is no trace of the window mentioned above, Calc may not have been able to generate an automatic save of the open worksheet. In that case, you can take a look at the program's backup folder, looking for a document with the same name as the original and the extension .bak.
To locate this folder, go to Calc's Tools > Options... menu (above), expand the LibreOffice section attached to the left pane of the window that opens, click the [+] button, then the Paths section and note the folder specified in Backups (for example, C:UsernameAppDataRoamingLibreOffice4UserBackup).
To have LibreOffice automatically save files more often, go to Calc's Tools > Options... menu, go to the Load/Save section (on the left) and indicate the time interval to be used in the text field corresponding to the Save auto restore each information (which should be checked). To finish, press the OK button.
To finish, open a File Explorer window, go to the previously recovered path (taking care to activate the display of hidden files) and locate a file with the same name as the one you were working on with the .bak extension: when you have found it, right-click on its icon and choose the Open items with > LibreOffice Calc option from the menu offered to you. Remember, in any case, to remove the check mark from the program whenever you use the program to open this type of file.
Data recovery software
The procedures I showed you on Excel and LibreOffice Calc for Windows were not helpful? You couldn't recover the Excel file you were working on and you're thinking of throwing in the towel and starting over? Wait a minute. As an extreme solution, you can try to recover the file using special data recovery software like the ones I list below.
- Recuva - is one of the most powerful and efficient data recovery applications for Windows. It allows you to recover data from hard drives, SSD, USB flash drives, etc. with a very simple wizard. I have told you about it in detail in my topic guide on the subject.
- PhotoRec - is another great free and open source data recovery software that allows you to access deleted, damaged or overwritten files from the operating system again. I have explained how it works in my hard drive recovery guide.
- MiniTool Power Data Recover - another great software that, in a couple of clicks, allows you to restore any type of deleted or lost files from internal and external drives. In its free version, it allows you to recover up to 1 GB of data. For more information on this, you can refer to the corresponding section of my guide to recovering data from external hard drives (also valid for internal drives).
How to recover an unsaved Excel file on a Mac
As for the recovery of unsaved Excel files on Mac, it is quite similar to what has already been seen for Windows: you can try to access the files again using the procedures provided by Microsoft Excel, LibreOffice and, in extreme cases, with the help of some software specially designed for data recovery.
Microsoft Excel
Did an unexpected shutdown of Microsoft Excel cause the loss of the workbook you were about to finish? No problem: most likely, the next time you restart the program, you will have the opportunity to easily restore the file. I'll tell you how to do it right away.
If the shutdown occurred as a result of an unexpected program shutdown (without restarting the entire operating system), it should automatically display a warning window related to the event that just occurred: when this happens, all you have to do is place a check mark next to the Recover and Restart Microsoft Excel job and click the OK button, so you can try to restore the file automatically.
If the above window does not appear (if, for example, the program shutdown was caused by a power outage or a scheduled macOS restart), the steps to follow are slightly different: start Microsoft Excel as you would normally do, wait for a small screen to appear notifying you of the previous unexpected program shutdown and click the Open button, to restore the last saved file.
If you wish, to avoid accidental data loss in case of unexpected Excel shutdown, you can set a save interval shorter than the default (10 minutes), so that the program will automatically create a backup copy of the file, ready to be restored if necessary.
To do this, go to the Excel > Preferences... menu (top left). (top left), click on the Save button, put a check mark, if it is not already there, next to the option Automatically save each time element and define the time interval you prefer in the text field (e.g. 2 minutes).
LibreOffice
The procedure for automatic recovery of a lost Excel document after an unexpected shutdown of LibreOffice Calc is practically identical to the one already seen for Windows: what you have to do, in practice, is to restart LibreOffice, select the document to recover in the screen that is proposed to you and click the Start and End buttons, so that you can finish the recovery.
If the above steps are not effective, I suggest, also in this case, that you look for an automatic backup (of type NameDocumentOriginale.bak) inside the LibreOffice backup folder: to find out where it is, start LibreOffice Calc, go to the LibreOffice menu> Preferences.... (top left) and, after clicking on the Paths entry, note the corresponding folder under Backups (e.g./Users/username/Application Support/LibreOffice/4/user/backup).
After that, open a Finder window (the smiley face attached to the Dock bar), access the Go > Go to Folder... menu (above), paste into it, and click on the folder you want to backup. (at the top), paste the previously copied path into it and press the Enter key on your keyboard. To finish, activate the display of hidden files by simultaneously pressing the cmd+shift+ keys and find a file named DocumentName.bak, then open it with LibreOffice by right-clicking on its icon and choosing Open with from the proposed menu.
Note: if necessary, you can make LibreOffice automatic saves more often. To do this, go to the LibreOffice > Preferences... menu, click on the Load/Save item and specify the desired time interval in the text field attached to the Save automatic restore every information (also make sure that the corresponding check box is checked). Finally, click the OK button at the bottom of the window.
Data recovery software
Even though you followed the instructions I gave you in the previous sections of this tutorial, were you unable to successfully recover the Excel file you were working on? In that case, you can try to access it again using a data recovery program, useful in case the backup copy of the document you are interested in was accidentally overwritten by the operating system.
- Time Machine - this utility, included "standard" in macOS, allows (if properly configured) to restore previous versions of files and folders very easily. I told you about it in my tutorial dedicated to its operation.
- Disk Drill - excellent and powerful data recovery program. Available for a fee (it costs 79 euros), you can try it for free to see previews of recoverable files. For more information, see the dedicated section of my guide to recovering deleted files on Mac.
How to recover an unsaved Excel file on smartphones and tablets.
Are you used to working with the Excel apps available for Android and iOS and would like to know how to recover a file you were working on that you didn't save manually?
If so, you don't have much to fear: in a moment you will understand why. You should know that documents created through these applications are stored by default in the OneDrive space that is paired with the Microsoft account used to sign in. This also applies to documents opened through apps - once they are opened, a copy is created in the cloud.
Fortunately, the Excel app (as well as all Office apps for smartphones and tablets) automatically saves documents to the cloud when the device is connected to the Internet; otherwise, a copy of the document is saved in a specific memory area and synced to the cloud as soon as the device is connected to the Net.
For this reason, recovering an unsaved Excel file on smartphones and tablets is very easy: after opening the app, tap the Recent tab (bottom left) and tap the name of the file you want to open. It contains all the changes you've made over time, including those you haven't saved manually.
Note: You can also access your Excel files saved in the cloud from your PC by connecting to the OneDrive website, synchronizing with Microsoft Excel Desktop (from the File > Account menu) or using the OneDrive program for Windows and Mac.


