How Outlook 365 works
Let's start with Outlook 365, that is, the e-mail program integrated into the Office 365 suite, which also includes Word, Excel and all the other software typical of the Microsoft productivity suite, try a subscription. Below you will find all the details of the case.
Office 365 pricing
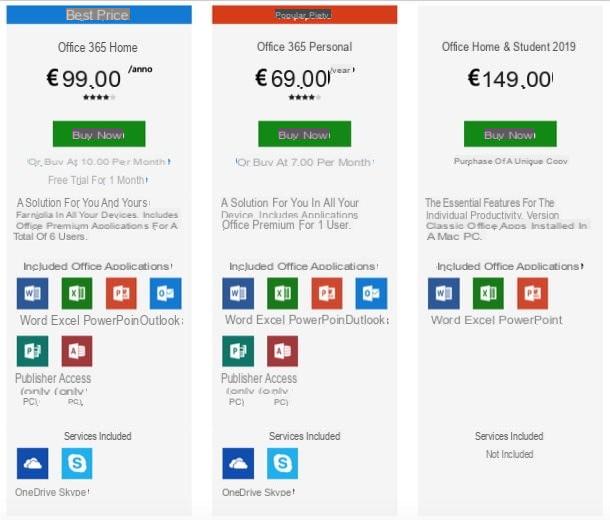
Before explaining in detail how Outlook works, I think it is of fundamental importance to explain the costs of the Office 365 package, since the latter is not free.
- 365 Office Staff: costs 7 euros / month or 69 euros / year and includes Word, Excel, PowerPoint, OneNote, Outlook, Publisher and Access (the latter two only on Windows), 1TB of space on OneDrive, 60 minutes of Skype calls per month and '' access to all the functions of the Office apps for smartphones and tablets. This plan can only be used on one computer and one mobile device.
- Office 365 Home: costs 10 euros / month or 99 euros / year and includes Word, Excel, PowerPoint, OneNote, Outlook, Publisher and Access (the latter two only on Windows), 1TB of space on OneDrive, 60 minutes of Skype calls for a number per month and access to all functions of the Office apps for smartphones and tablets. This plan can be used on up to 6 computers and 6 mobile devices. It comes with a 30-day free trial.
In case you are a business user, you can subscribe to one of the Office 365 plans dedicated to professionals (more info here), while if you are a student you may want to consider Office Home & Student 2019 and purchase a one-time license (without updates to subsequent major releases, mobile apps and cloud services) for a one-time fee of 149 euros.
Download and installation

Once you have clarified the features of the Office 365 offer, I would say that you are ready to download and install Outlook.
The first thing you need to do, therefore, is to activate an Office 365 plan. To do this, you need to connect to the official Microsoft website and click on the button Try free for 1 month.
Next, type in theemail address and Password of your Microsoft account and select the item Log in, to login. If you don't have a Microsoft account, you can create one by following the steps I outlined in my guide on how to create a Microsoft account.
Once logged in, click on the entry NEXT and choose a payment method valid between credit or debit card, direct debit or PayPal, and then enter the relevant data. I remind you that, once the free trial period is over, the service will cost 10 euros / month. However, you can rest assured: there is the possibility to disable the automatic renewal (and therefore the payment of the service) at any time.
Once you have entered your payment information, click on the item Add profile address and enter your address, then click in order on NEXT, Save e Subscribe to access the Microsoft Office download page.
Now, proceed with the Microsoft Office download by clicking on the relevant button Install. If you use a Mac, you can download Outlook for free and activate it through your Microsoft account connected to Office 365 directly from the Mac App Store.
Once the download is complete, you just need to open the Office installation package and follow the on-screen instructions. If you are using a computer Windows, you must then start the .exe file obtained and wait for the tool to download and install the suite automatically. Please note that download times may be quite long.

In case you are using a Mac, you just have to open the package .pkg and select the items in order Continue, Continue, Accept e Install. At this point, you need to type the Password of your user account on macOS (the one you use to log in to the system) and select the item first Install software and then those Close e Move.
At the end of the procedure, you will be asked to register your copy of Office 365 with your Microsoft account details. If this does not happen, try to open Outlook and see if a message of this type appears on the screen. You can also try clicking on the item Sign in to take advantage of all the features of Office (Windows) or go to the menu Outlook > Activate Office which is at the top left (macOS).
In the window that appears on the screen, select the item Log in, type l 'email address associated with your Microsoft account, tap on NEXT and enter the relative Password, in order to activate the software. Once this is done, you can finally enjoy your free trial or subscription. In case you don't know how to set the various fields required by Outlook, I recommend that you check out my tutorial on how to configure Outlook.

I remind you that, to avoid unwanted charges, you will have to disable the automatic renewal of Office 365. To do this, connected to the official Microsoft website, run the login with your Microsoft account (if necessary) and select the entry Manage accounts.
In the screen that appears on the screen, click on the item Turn off automatic renewal, type the Password of your Microsoft account and press the button Confirm cancellation. In this way, you will not have to pay any more money to continue using the Office 365 suite (which of course will expire at the end of the 30-day trial, and then eventually reactivate if the subscription is paid).
Once Outlook starts, it's time to set up your email account. To do this, simply enter yours email address in the appropriate field and press on the item Connect/Continue. If everything works correctly, your account will be configured automatically.
If not, if you are on Windows, try ticking the box Allow manual account setup and press on the item Connect. If you are on macOS instead, you need to select the option IMAP / POP. Perfect, now the client will allow you to enter the data IMAP o POP linked to your email account. For more information and the complete procedure, I suggest you take a look at my guide on how to set up Outlook.
How to use Outlook

You are now ready to take your first steps in Outlook. Everything you need to read emails, reply to them and write new ones is on the main program screen. In fact, in the bar on the left you will find the various boxes Incoming mail, Junk Mail, Mail sent, Drafts e Deleted mail.
Incoming messages will be clearly delivered to the folder Incoming mail, while the outgoing ones are available in that Mail sent. For the rest, to open an email you just have to press on the appropriate one box and, using the buttons at the top, carry out all the necessary actions, such as delete the message, archive it, reply or forward it to someone else.
To write a new email, you simply have to press on the item New message present at the top left, enter theemail address of the recipient, theobject, text and press on the item Send. In short, using the basic features of Outlook is very simple, everything is just a click away.
How the Outlook archive works

How do you say? Would you like to archive the emails that arrived in Outlook? Don't worry, the program has its own archiving function which allows you to automatically move older messages to a special folder, separate from the rest of the emails, thus tidying up the inbox and making the internal database "cleaner".
There are several methods to use this feature, but on Windows it is usually enough to put the check mark on the items Archive the folder and all subfolders e Archive antecedent elements present in the path Tools> Clean Up Old Items.
In the version of Outlook for macOS, however, this native functionality is not present and you must therefore create special ones rules that perform the same function. I recommend that you check out my guide on how to archive Outlook emails for all the details of the case and for the complete procedure.
How Outlook recall works

Outlook also offers a feature to retrieve sent emails, as long as the recipient has an Exchange account in the same organization. Put simply, you can only "undo" messages that have been sent within your organization. Also, these must be directed to an Exchange account and the recipient must not have read them.
To retrieve a message sent from Outlook that meets these requirements, open the program, select the item Mail sent from the left sidebar and open theemail to be canceled. In the window that appears on the screen, then click on the item Message (top left), select the item Actions (top center) and press on the item Recall the message.
Perfect, now you can choose whether to delete the unread copies of the message or replace them with a new message, by placing the check mark next to one of the two available options and clicking the button OK. But be careful: the recipient of the message will still receive a notification that the latter has been called back.
How Outlook Web App Works
You are interested in the Web Mail service Outlook.com from Microsoft? Well, now I'll explain how to take the first steps inside the latter.
How to create an Outlook address

Before proceeding to explain in detail how Outlook.com works, I think it may interest you to know how to create an address through this service.
Well, to create an Outlook account, you need to connect to the official website of the service and press on the item Create free account. On the page that appears on the screen, then type the email address you want to create and press onicona della freccia verse il basso, choosing between the extension outlook.it is that outlook.com.
At this point, fai clic sulla voce NEXT and type the Password you intend to use to access your mailbox. I remind you that you must necessarily enter a password consisting of at least 8 characters and that contains at least two elements, including uppercase or lowercase letters, numbers or symbols. Once this is done, hit the button NEXT to continue.
Now, insert Your name, Last name, award-winning NEXT, and type Country / geographic area e date of birth (Day, Month e Year). After that, click on the entry NEXT and verify your identity by entering the code of confirmation that is shown to you on the screen.
Perfect: now all you have to do is press the button NEXT to complete the procedure. You will then be asked to set the language and time zone and to choose the graphic theme to use for Outlook.com.
If you need more information, I recommend that you consult my tutorial on how to create an Outlook account.
How to use Outlook online

Once you've created an Outlook address, I'd say you're ready to learn how to use Microsoft's email service Web App.
If you are acting as a computer, you can access your e-mail account simply by connecting to the official Outlook website and pressing on the item Log in. After that, you will need to clearly enter theemail address and Password associated with the account created above.
Otherwise, the Outlook Web App is quite simple to use and the basic functionality is identical to that of the desktop e-mail client. Therefore, I recommend that you consult the chapter on how to use Outlook to learn more.
How Outlook Calendar Works

The Outlook Web App is also used by many users because of its calendar, which allows you to manage your tasks from any workstation.
To access this feature, you just have to click on the icon Calendar (the second from left to right, bottom left) or connect to the Outlook Calendar page. From here you can add an event by simply clicking on the entry New event, present at the top left, by inserting title, day, clockwise, position and eventual warning time (eg "Tell me 15 minutes before") and pressing on the voice Save. To delete an event, just press on the instead event name I will select the voice Delete.
Once an event has been entered, it will appear on the relevant day and all its details can be consulted simply by clicking on its box. To switch from month to month, you can simply use the arrows icons present at the top left, while to change the display method you have to press on the item Month at the top right and choose between Month, Week, Working Week e Day.
Obviously, there is also the possibility of adding other calendars. This can be done by pressing on the item Add Calendar present on the left and typing the calendar name. To activate only a certain calendar, you must affix the checkmark next to his name. If you want more details on how to export or import other calendars, I recommend that you take a look at my guide on how to sync Google Calendar with Outlook.
How the Outlook address book works

Outlook also has a handy address book, which allows you to keep your contacts in order.
To access the latter, you just have to press onicona Social (the third from left to right at the bottom left) or connect to the Outlook address book page. To add a new contact, simply press on the entry New contact present at the top left, enter Your name, Last name, email address, cellphone number, company e notes e premere sul pulsating Crea. Instead, you can manage an existing contact through the buttons at the top, by clicking on the items Modification o Delete.
By pressing, instead, on the item Manage, you can export or import your address book. In particular, it can be exported using the format of CSV file with UTF-8 encoding. In case you need to export your contacts in CSV format, take a look at my tutorial on how to make CSV files, where you will find all the information on how to export the address book.
In case you want to import contacts instead, I suggest you take a look at my guide on how to import Outlook contacts. The address book can also be synchronized with other services and devices: I invite you to consult my guide on how to synchronize Outlook with Gmail and how to synchronize the address book on Android for more details.
How Outlook for Android and iOS works

Outlook also has an official application for smartphones and tablets, which allows users to manage their email address on the go. However, it is also possible to configure the accounts of other services, such as Gmail, Yahoo and accounts through the IMAP and POP3 protocols.
To install the Outlook application, open the Play Store (if you are using Android) or the App Store (if you have an iPhone or iPad), search “outlook” and select l 'icona dell'app from the search results. After that, tap on the item Installa / Ottieni and, if you are on iOS, verify your identity through Face ID, touch ID o password dell'ID Apple.
Once the app is downloaded, start it, press on the item Start, select the voice Continue (o Add account on iOS) and follow the instructions that appear on the screen. If the address you entered is not present among those preconfigured on the device, you will be prompted to enter the data relating to its parameters IMAP e SMTP.
In case you want to add a second email account, you can do it by tapping on the icon ☰, present at the top left, and pressing theicona dell'ingranaggio. After that, tap on the item Add account and follow the instructions that appear on the screen.
Once the various accounts have been configured, the application will start synchronizing your emails, synchronizing all messages. Clearly you will find the latter in the folder Incoming mail, reachable by pressing the icon ☰, top left. Obviously there are also folders Mail sent, Junk Mail, Drafts e Deleted mail.
When you receive a new e-mail, the smartphone will notify you through a common notification, which will also briefly anticipate the content of the message. In case you want to change this option, just press the icon first ☰, present at the top left, and subsequently on theicona dell'ingranaggio.
Once this is done, click on the item Notifications and you will find all the settings related, for example, to customizing the sound of receiving a new email and the folders on which to activate the alerts. For more information about the Outlook mobile app, I recommend that you consult Microsoft's official guidelines.
How Outlook works


