Open USB stick on Windows
When you insert a USB stick into the appropriate slot on your PC, the autoplay function generally starts on Windows (AutoPlay), which shows a number of options for managing the content on the drive.
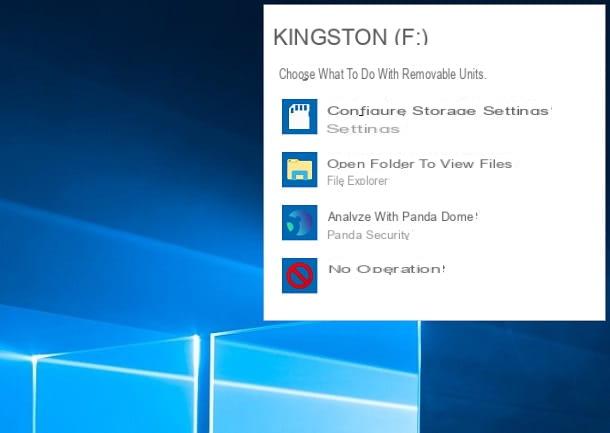
These options are shown in a box that is shown in different positions, depending on the version of Windows installed on the PC. Up Windows 10, for example, after waiting for the automatic installation of the drivers necessary to access the files on the key, you can immediately click on the box that appears at the bottom right of the desktop, in order to display the screen with all the possible operations to be performed .
The options available depend on the type of files on the USB key and the software installed. In any case, to view the files inside the key, click on the item Open folder to view files.

Su Windows 7instead, after the drivers are installed to recognize the hardware, a box is shown in the center of the screen through which to make some choices: play the audio / video contents (Play), import multimedia contents to PC (Import images and videos), browse the contents of the USB stick (Open folder to view files) or use the hardware as a backup drive for Windows 7 (Use this drive for backup).

In case the function does not work AutoPlay of Windows, you can act from the Control Panel (for all versions of Windows) or from Settings on Windows 10.
Su Windows 10, press the key combination Win + i or click onicon with an ingranaggio you find in the menu Home. In the panel of Settings select items devices > AutoPlay and make sure it is moved to ON the lever near the wording Use AutoPlay for all media and devices.
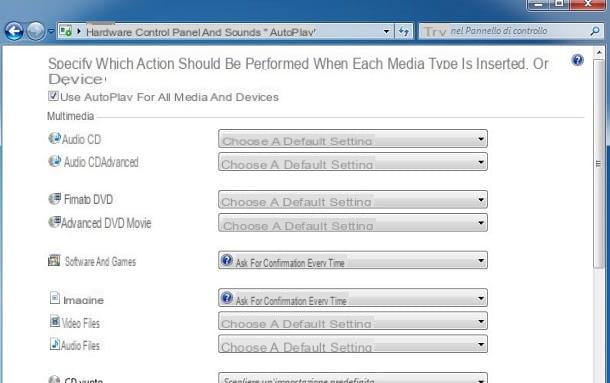
So make sure the voice is set Ask for confirmation every time under the heading Removable drive, to show you the options selection box when you connect the USB stick; alternatively, choose the item you prefer from the drop-down menu, in order to automate the behavior of Windows when inserting the USB key into the PC slot.

If you still use Windows 7instead, press the key Windows on the keyboard and click on the item Control Panel. If you do not see it, you can start the Windows search function by typing the words "control panel”And selecting the corresponding search result.
In the screen that is shown to you, then reach the items Hardware and Sounds > AutoPlay and make sure the box is activated Enable AutoPlay for all media and all devices.

In case you missed the autoplay pane or disabled this feature, you can browse the files inside the USB stick manually. To do this, open File Explorer, by clicking on thefolder icon that you find in taskbar, and select the item corresponding to the name of the USB stick, Such as Kingston (F:), located in the side menu.
I remind you that, in order to be able to properly open a USB stick on a Windows PC, it must have a compatible file system. The device must be set in FAT32, exFAT o NTFS. If you have a USB stick set to HFS o HFS +, ie those developed by Apple, this will not be accessible from Windows.
In this case, you need software that allows you to do this, such as MacDrive, of which I told you in this guide of mine. If you want to learn more about the topic, you can consult my guide on how to format a USB stick, in which I explained in detail the different types of file systems to choose for your storage device.
Open USB stick on macOS

Su MacOS, opening a USB stick is really simple. What you need to do is simply connect the peripheral to the USB port, so that the operating system mounts it on Desk, ready to use. By double clicking on the icon in question, you will be able to launch the Finder and access the files it contains.
If your Mac doesn't have a standard (Type-A) USB port, it probably has one Thunderbolt (USB-C), for which you will need an adapter, such as those listed below.
Vedi offers your AmazonIn addition, you can access files contained on a USB stick directly from the Finder (the smiling face icon on the Dock bar), via the left side panel, by clicking on the name of the storage device.
Computers running macOS can open any storage device, regardless of the file system used. As for that though NTFS, on the other hand, macOS only allows you to read the files contained within the devices with this file system, without any possibility of transferring or creating new data.
In this case, you can use some third-party tools for macOS that allow you to enable full support for NTFS, such as Paragon NFTS for Mac. If you want to know more about how to enable writing data on USB sticks in NTFS on macOS, I suggest you read my guide dedicated to the subject. If, on the other hand, you just want to change the file system of the USB stick to a completely natively compatible one, I suggest you read this tutorial of mine, in which I'll explain how to format a storage drive on macOS.
Open USB stick on Android

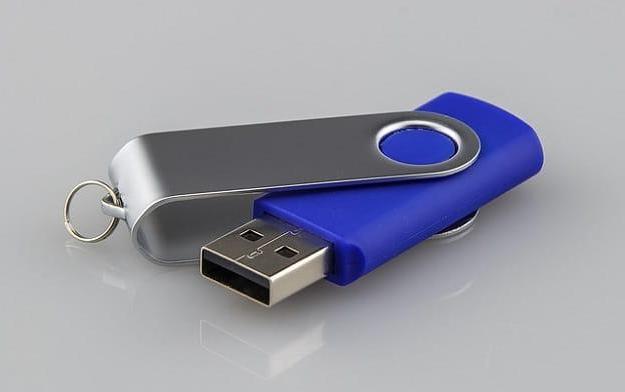
The devices Android allow you to open USB sticks with both file systems FAT32 e exFAT, which in NTFS. What you need is a USB stick with a micro USB or USB Type-C port, like the one you can see below.
If not, you can use any USB hub or adapter with a micro USB or USB Type-C port, to connect storage devices equipped with a USB Type-A port, of which you can find some examples below.
When you connect the USB stick to an Android smartphone or tablet via hub or adapter, you will be shown a notification in the Notification Center, indicating that the device has been correctly recognized. Once this is done, start any app for managing and browsing files, such as Google files, and select the item related to name of the USB stick, so as to access the files inside it.
Open USB stick on iOS

A USB stick can be inserted into the appropriate slot lighting dell 'iPhone or the 'iPad to view and transfer a copy of the data in the device memory. It is not possible to connect any USB stick, but you must have one that has the porta Lightining and l 'dedicated app to access the data reading and writing functions.
If you don't already have one, you can refer to the list of USB storage devices that you can find below.
on iPad Pro released starting from 2018, however, a USB Type-C port is available, which facilitates the operations of connecting peripherals with this Apple device. For this reason, you can use any USB stick with Type-C connector or USB Type-A to Type-C adapter to connect mass storage devices and import media files directly with the app. Gallery.
Open USB stick on PS4

If you have a PlayStation 4 and you want to use your USB stick with this console, the operation is simple. First, insert the USB stick into the slot on the game console and then launch the app Media player.
Once this is done, from the items you see, select the one corresponding to name of the USB stick and press the button X on the gamepad to access it. By doing so, you will be able to play the multimedia contents inside the mass storage device via the PlayStation 4.
If, on the other hand, you want to use the USB stick as a storage device to install applications on it, this must have some requirements to respect: it must be a USB 3.0 or higher mass device, with at least 250GB of total space, up to a maximum of 8TB.

If the USB stick meets these requirements, start the panel Settings PS4 and select items devices > USB storage devices > Mass Storage Device [nome dispositivo]. In the screen that is shown to you, press the button Format as extended storage memory and wait for the process to finish, so as to use the USB stick as additional storage for the PS4.
Open a USB stick without formatting it

It may happen that, by inserting a USB key into the USB slot of the computer, it is not recognized by the operating system, as if it had not been connected. The possible problems can be of different entities: the USB key or the USB port of the PC has hardware damage (often not solvable), there are virtual errors in the storage device (which I will talk about in this chapter) or it does not start hardware recognition for operating system errors. In the latter case, the possible solutions may be different, depending on the operating system in use.
Windows
Su Windows, the hardware recognition problem could result from a driver malfunction or failure to assign the letter to the device. But let's go in order.
In case Windows hasn't assigned a letter to the device, right click on the button Home (the flag icon located in the lower left corner of the screen) and, in the context menu, select the item Disk management. In the screen that opens, right-click on the name of the USB stick, and select the item Change drive letter and path give the menu to compare.

Now, in the window that opens, click on the button Add, select the voice Assign this drive letter and choose one of the unassigned letters from the drop-down menu on the side. Press on OK to confirm the assignment.
If the problem, on the other hand, derives from errors on the USB port drivers, you will have to act through the panel Device management, which you can reach from the context menu that you find by right clicking on the button Home of Windows.
After the panel starts successfully, locate the entry Controller USB, premi sull 'icon with a triangle to expand it and verify that all peripherals are active. You can verify this by the fact that there is noicon with an arrow on the different USB icons.

If not, right-click on the disabled item and, in the context menu, click on Enable device, restarting the PC. Now, by plugging in the USB stick, Windows should correctly recognize it.
If the problem persists, you can try to select the item Uninstall device and restart your PC. Windows will download the drivers from the Internet to ensure the correct operation of the USB port.
MacOS

Su MacOS, solving the recognition problems of a USB stick takes a short time. Often the problem stems from a malfunction of the System Management Controller (SMC), which requires a reset to restore it.
Before starting the reset of this component, I advise you to check that the USB key is correctly connected to the Mac. Then click on theicon with bitten apple and select the item About this Mac. In the box that is shown to you, click on the button System report and, in the new screen that you see, click on the USB item, in the left side panel.
If, among the items, you should read the name of the USB stick, then just click on the items vai > Go to the folder, which you find in the menu bar at the top. In the box that appears, type the string / Volumes / I awarded Submit on the keyboard. You will see all the storage devices within the screen of the Finder. Now that you have the Finder open, go to the menu Finder > Pref Renze (top) and put a check mark in the box External disks, to display the icon of the USB key mounted on the Desk say macOS.
If, on the other hand, you do not have to read the name of the USB stick inside the System report, it is necessary to reset theSMC, a procedure that often solves these kinds of problems. Below I will explain how to proceed, based on the type of computer with macOS in your possession.
- If the MacBook is provided with removable battery, turn it off, remove the battery and press and hold the switch off key for 5 seconds. Mount the battery again and turn the MacBook back on.
- If the MacBook he has one non-removable battery, turn it off and on again, while holding down the keys uppercase + ctrl + option + power button. Hold for about 10 seconds and then release the keys. Then press the again power button to start the MacBook.
- If you own a Mac that plugs directly into the wall outlet, turn it off and unplug the power cord. Wait about 15 seconds, plug the power cord back in and wait another 5 seconds. Now, press the power button, to start the Mac.
- Per i computer Apple con T2 chip, turn off your device and press and hold the power button for 10 seconds. Release the key, wait a few seconds and press it just one more time to start it normally. Alternatively, in case of Macbook with T2 chip, after turning it off, keep the keys pressed uppercase right + option left + ctrl sinistro for 7 seconds. Keep pressing these keys and also press the power button for another 7 seconds. Release all keys and wait a few seconds. At this point, press the again power button to turn on the MacBook.
Open a damaged USB stick

If your USB stick is having trouble being recognized by your computer's operating system, the problems most likely stem from virtual errors. These can be fixed without any need to format the hardware, as the default Windows or macOS tools will fix them, giving you the option to open the USB stick.
Su Windows, the tool to use is Error checking. Its screen is displayed when you insert a USB stick with problems or reach it from the panel Property hardware. In the latter case, open File Explorer, right click on the name of the USB stick, located in the left sidebar, and select the tab Instruments from the panel you view.
Fatto ciò, first prize Check it out che trovi to fianco della dicitura Error checking and wait for the analysis to complete. Then press the button Scan and restore drives, to troubleshoot problems detected by the Windows tool.
Su MacOSinstead, you can rely onDisk Utility, via the function SOS. Start the Launchpad and click the icon of Disk Utility. In the window that opens, click the name of the USB stick, then press the button SOS and finally, su Run. By doing so, the analysis and recovery procedure will be performed to correct the virtual errors of the USB stick.

If you want more information on how to restore a USB stick without formatting it, I suggest you read my guide dedicated to the subject.
If, on the other hand, you want to proceed with formatting the partition anyway, I suggest you read this guide dedicated to the topic. Finally, if you want to recover some lost data from a USB stick, due to the aforementioned errors, I suggest you read my guide on how to recover deleted files.
How to open USB stick


